
Microsoft Dynamics 365 Intelligent Order Management IOM Step by Step Tutorial
Follow Below StepsStep 1 - COMPLETEDCreate the free 30 Days Trial Version Environment for the Microsoft Dynamics 365 Intelligent Order Management
Step 2 - COMPLETEDSet up an IOM environment / Configure platform connection references in Microsoft Dynamics 365 Intelligent order Management
Step 3 - COMPLETEDCreate a new solution for PROVIDER Customization in Microsoft Dynamics 365 IOM / Create a provider solution
Step 4 - COMPLETEDCreate RequestBin Custom connector (Power Platform) for Step by Step Microsoft IOM Tutorial
Step 5 - COMPLETEDCreate new intake provider definition for Step by Step IOM Tutorial Scenario- Microsoft Dynamics 365 Intelligent Order Management / Register a new Provider in Library
Step 6 - COMPLETEDCreate a provider message request handler for Quick Start Lab Scenario for Microsoft Intelligent order Management IOM tutorial
Step 7 - COMPLETEDCreate Fulfillment provider in Microsoft Dynamics Intelligent Order Management IOM – Order to Fulfillment in IOM
Step 8 - COMPLETEDAdd a provider definition logic definition to the Outlook Provider Definition in Microsoft Dynamics Intelligent Management IOM
Step 9 - COMPLETEDCreate a provider action - Power Automate Flow - to send a fulfillment Order payload to RequestBin
Step 10 - COMPLETEDActivate the Intake, Fulfillment, & Internal Application Service provider created in Previous Step by Step IOM Tutorial
Step 11Create Orchestration policies and their associated rules for Quick Start Lab Scenario in Microsoft Dynamics 365 Intelligent Order Management IOM
Step 12Create Sales Order Orchestration flow in Microsoft Dynamics Intelligent Order Management IOM
Step 13Set up Customer(Account) and product mapping in Microsoft Dynamics Intelligent order Management IOM
Step 14Run a sample order orchestration flow in Microsoft Dynamics 365 Intelligent Order Management - END TO END DEMO IOM
Policies and their associated rules are used for different purposes in the Intelligent Order Management orchestration flow. Policies are classified into different policy types. Policy types ensure that users can easily select the appropriate policies in the orchestration flow.
To learn more about the policies and their different rules must follow the shared link – Policies and rules in Intelligent Order Management
Create policies for Quick Start Lab Scenario
This topic describes the steps required to create policies in Microsoft Dynamics 365 Intelligent Order Management.
- Select Policies under Orchestrations .
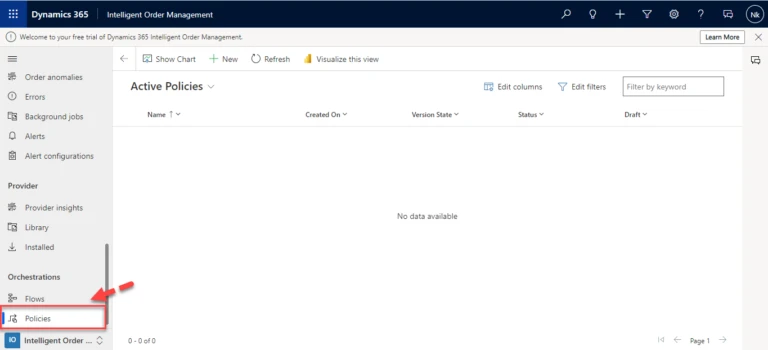
- Select New.
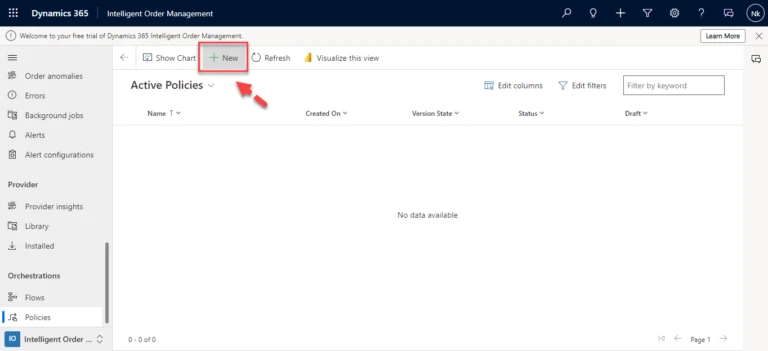
1. Order header validation policy
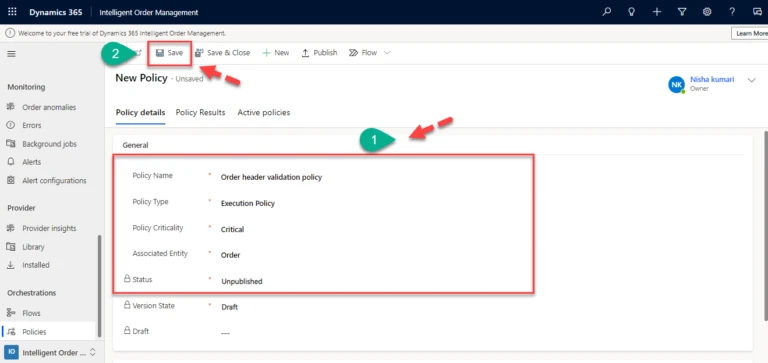
1. Create a new header validation policy
- For Policy Name, enter “Order header validation policy”.
- For Policy Type, enter “Execution Policy”.
- For Policy Criticality, enter “Critical”.
- For Associated Entity, enter “Order”
- For Status, enter “Unpublished”.
- Select Save.
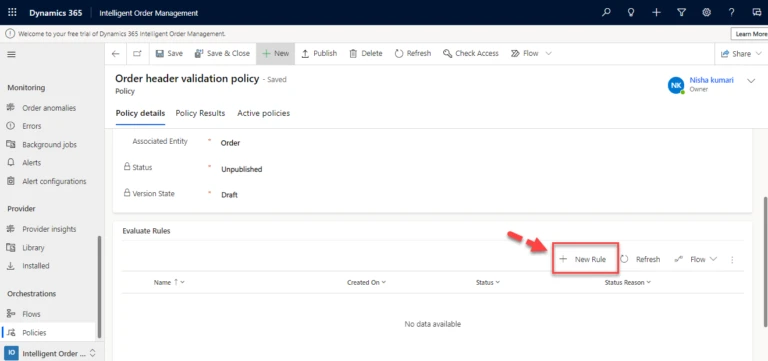
2. On the order header validation policy form, select New Rule.
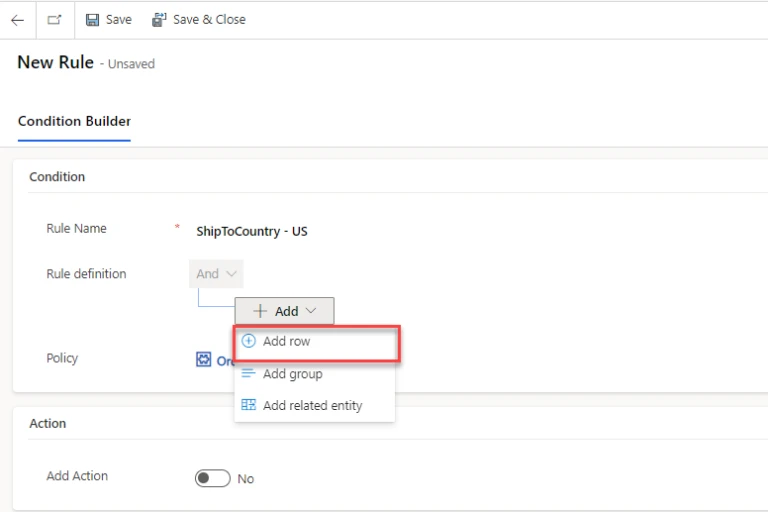
3. Under the condition for Rule Name, enter “ShipToCountry – US”.
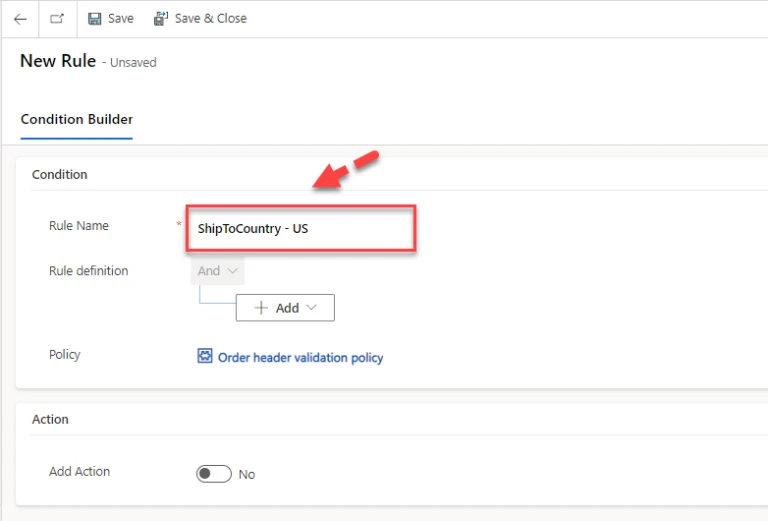
4. In the Rule definition append the Add and select the Add row option.
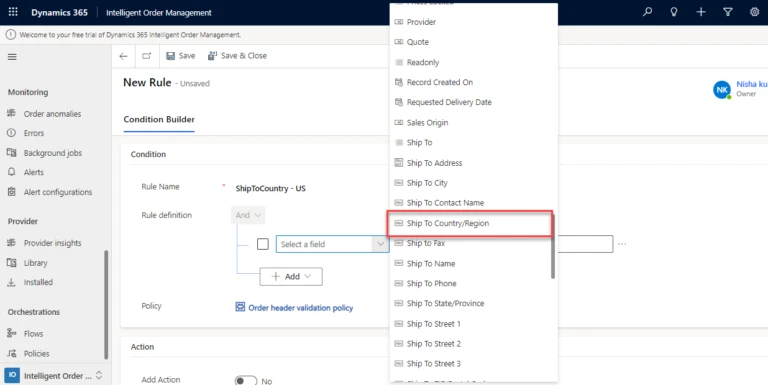
5. In the first field, select Ship to Country/Region.
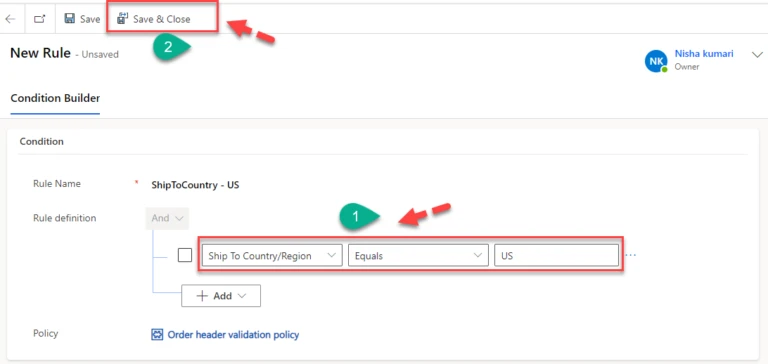
6. For Rule definition:
- In the first field, select Ship to Country/Region.
- In the second field, select Equals.
- In the third field, select US.
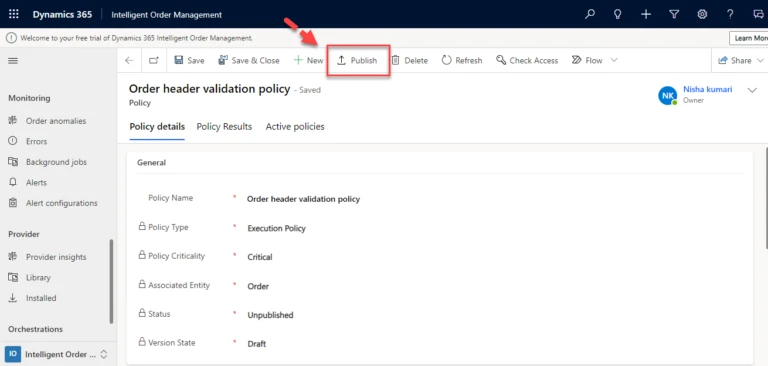
7. Select Publish.
2. Order line validation policy
- To create a new line validation policy, follow these steps.
- Go to Orchestration > Policies and select New.
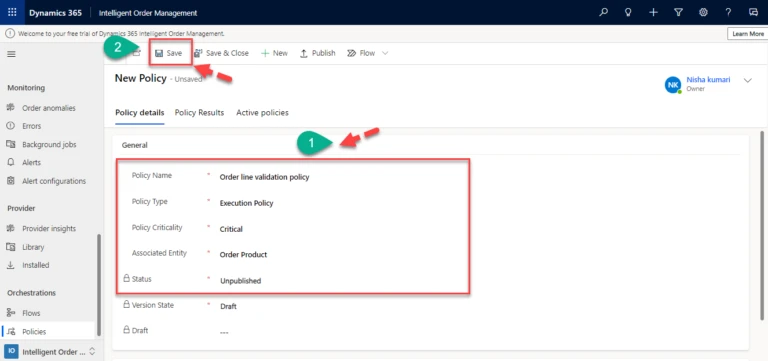
- For Policy Name, enter “Order line validation policy”.
- For Policy Type, enter “Execution Policy”.
- For Policy Criticality, enter “Critical”.
- For Status, enter “Unpublished”.
- For Associated Entity, enter “Order Product”.
- Select Save.
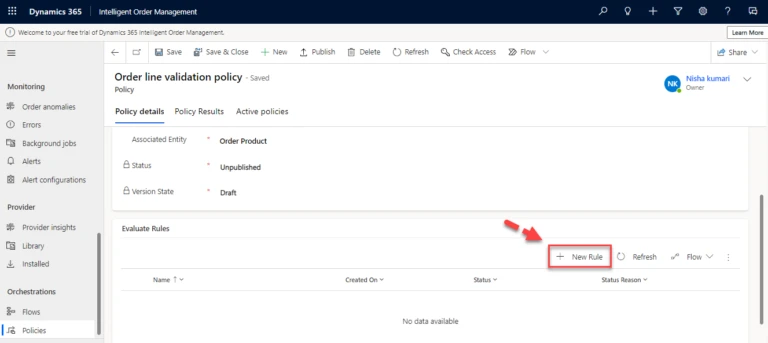
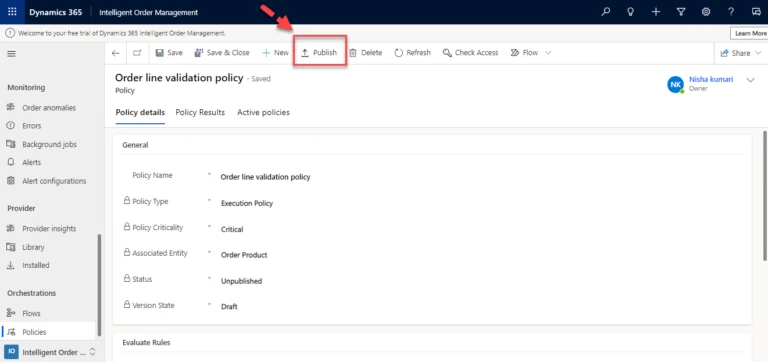
2. On the order line validation policy form, select New Rule.
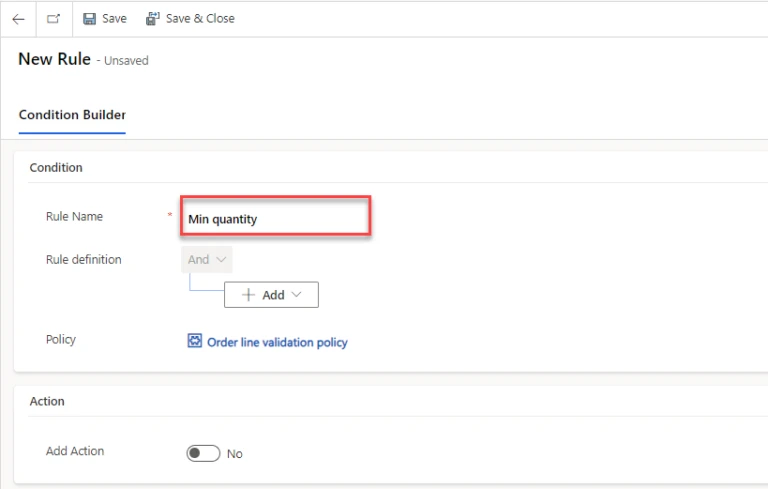
3. Under Condition, for Rule Name, enter “Min quantity”.
4. For Rule definition:
- In the first field, select Quantity.
- In the second field, select Is greater than or equal to.
- In the third field, enter or select 5.
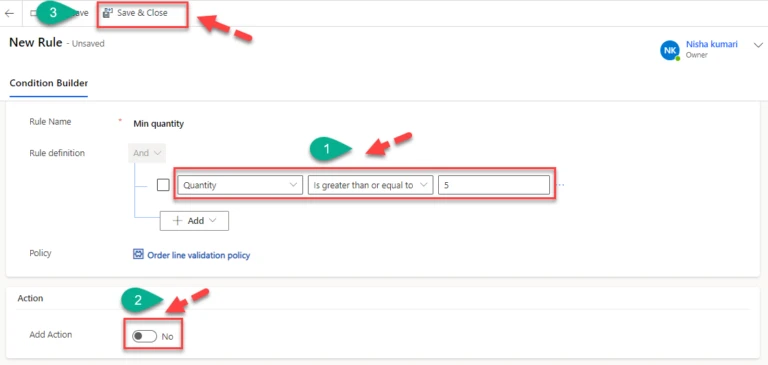
5. Select Publish.
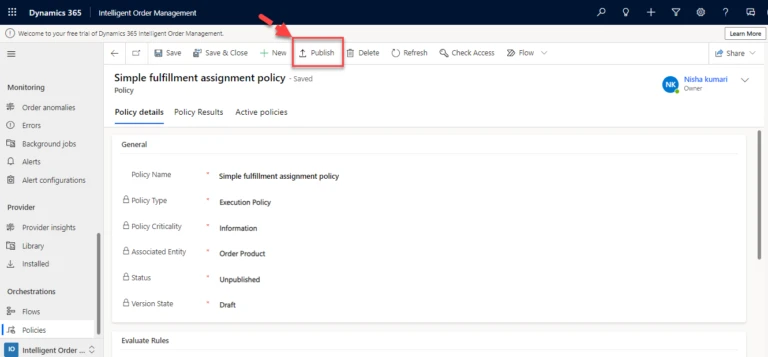
3. Simple fulfillment assignment policy
- To create a simple fulfillment assignment policy, follow these steps.
- Go to Orchestration > Policies and select New.
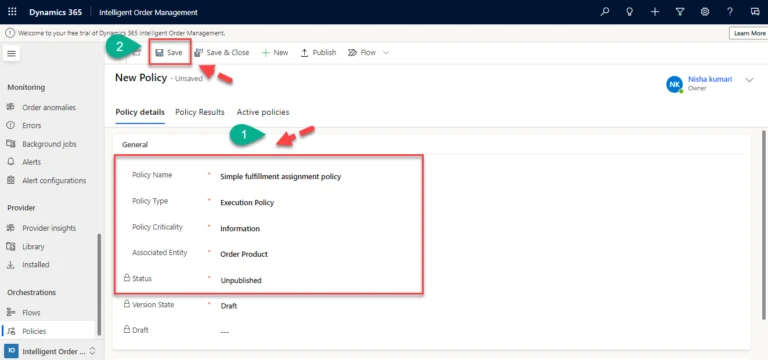
- For Policy Name, enter “Simple fulfillment assignment policy”.
- For Policy Type, enter “Execution Policy”.
- For Policy Criticality, enter “Information”.
- For Status, enter “Unpublished”.
- For Associated Entity, enter “Order Product”.
- Select Save.
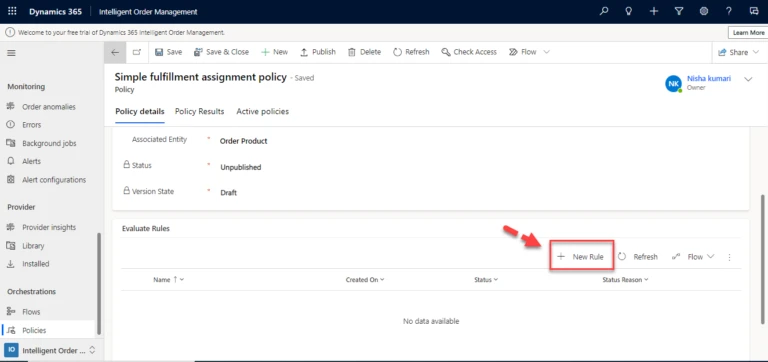
2. On the simple fulfillment assignment policy form, select New Rule.
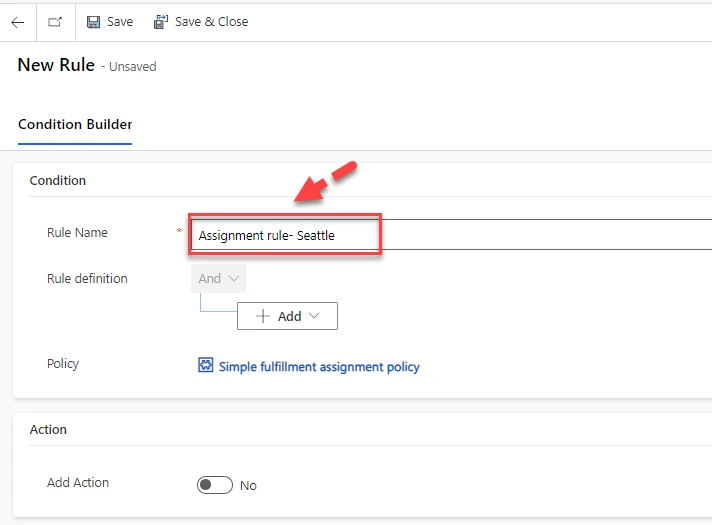
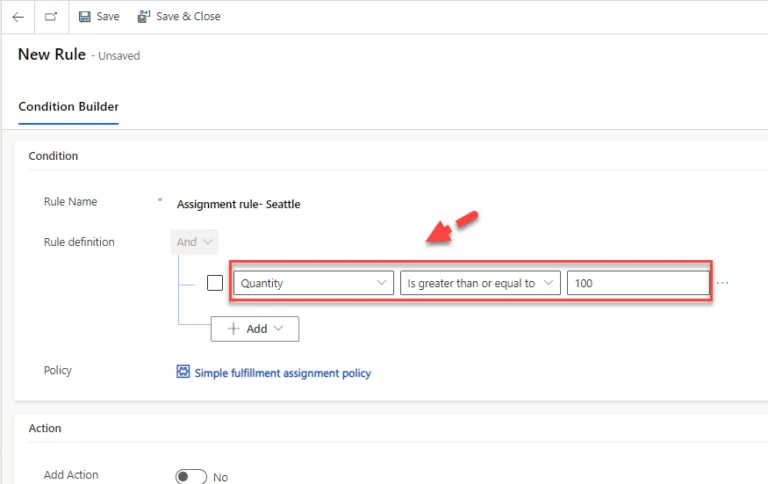
3. Under Condition, for Rule Name, enter “Assignment rule- Seattle”.
4. For Rule definition:
- In the first field, select Quantity.
- In the second field, select Is greater than or equal to.
- In the third field, enter or select 100.
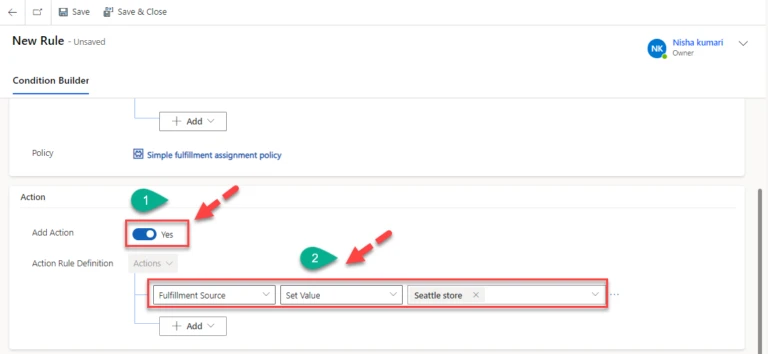
5. Under Action, set the Add Action value to Yes.
- In the first field, select Fulfillment Source.
- In the second field, select Set Value.
- In the third field, enter or select Seattle store.
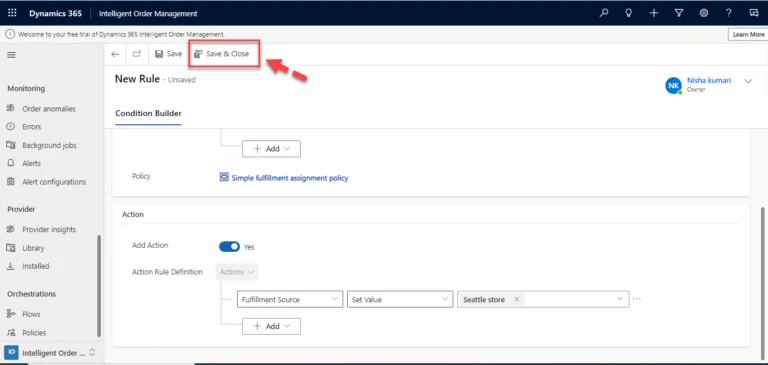
6. Select Save and close.
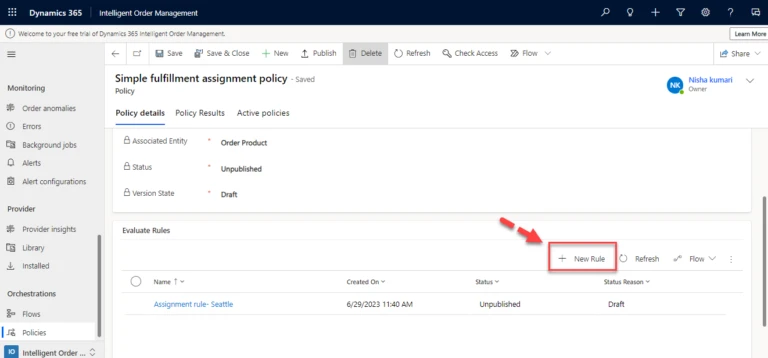
7. On the simple fulfillment assignment policy form, select New Rule
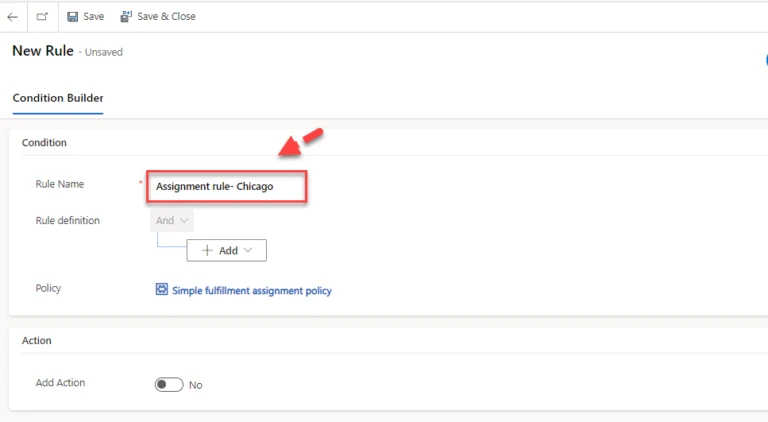
8. Under Condition, for Rule Name, enter “Assignment rule- Chicago”.
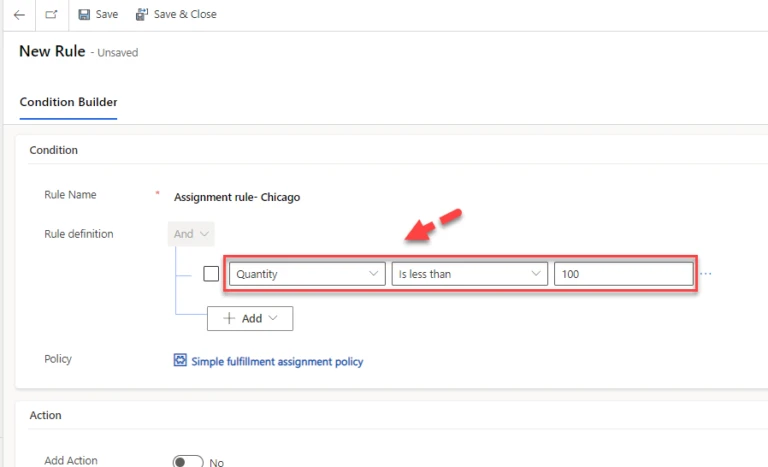
9. For Rule definition:
- In the first field, select Quantity.
- In the second field, select Is less than.
- In the third field, enter or select 100.
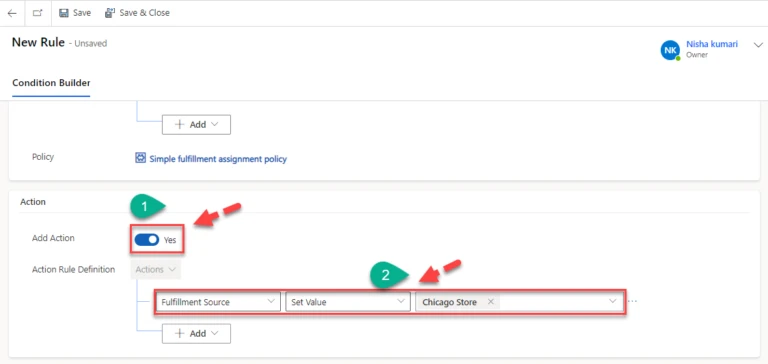
10. Under Action, set the Add Action value to Yes.
- In the first field, select Fulfillment Source.
- In the second field, select Set Value.
- In the third field, enter or select Chicago store.
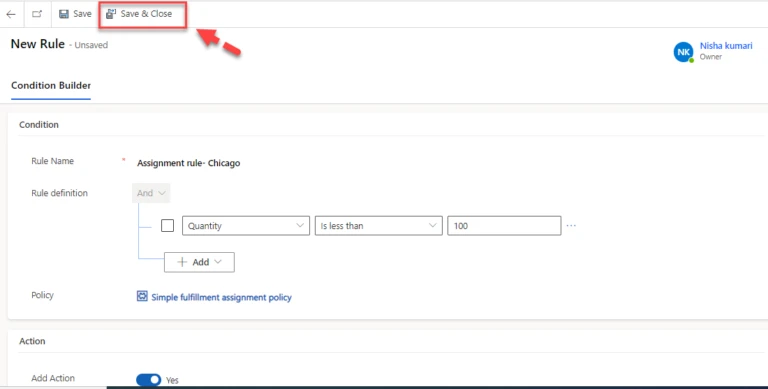
11. Select Save and close.
12. Select Publish.
4. Fulfillment filter policy - Seattle
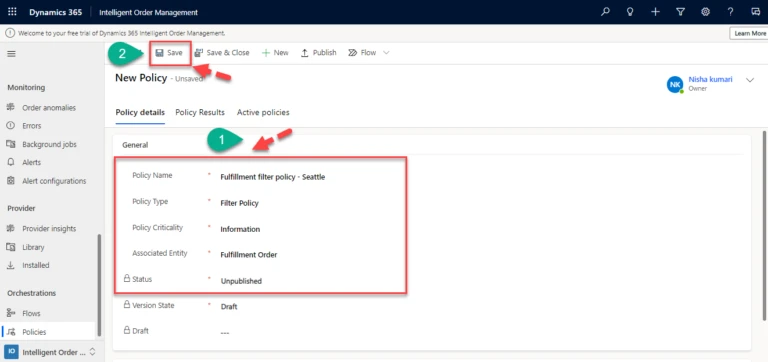
- To create a filter policy for the Seattle store, follow these steps.
- Go to Orchestration > Policies and select New.
- For Policy Name, enter “Fulfillment filter policy – Seattle”.
- For Policy Type, enter “Filter Policy”.
- For Policy Criticality, enter “Information”.
- For Status, enter “Unpublished”.
- For Associated Entity, enter “Fulfillment Order”.
- Select Save.
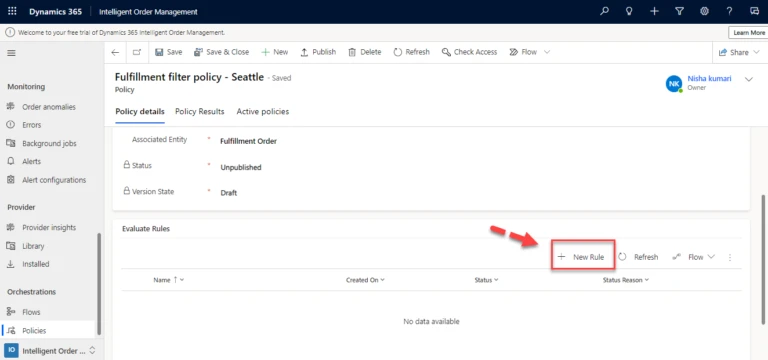
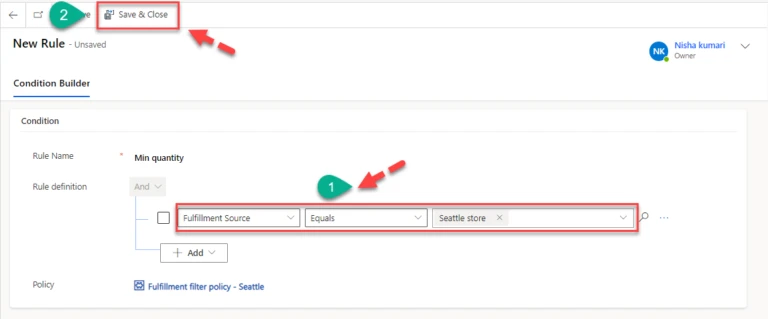
2. On the Fulfillment filter policy – Seattle form, select New Rule.
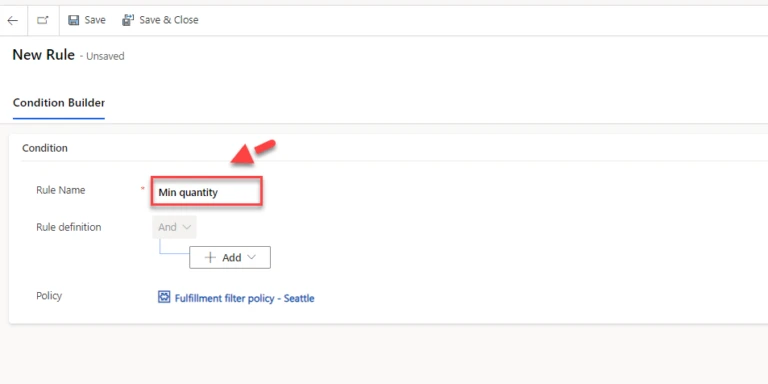
3. Under Condition, for Rule Name, enter “Min quantity”.
4. For Rule definition:
- In the first field, select Fulfillment Source.
- In the second field, select Equals.
- In the third field, enter or select Seattle store.
- Under Action, set the Add Action value to No.
- Select Save and close.
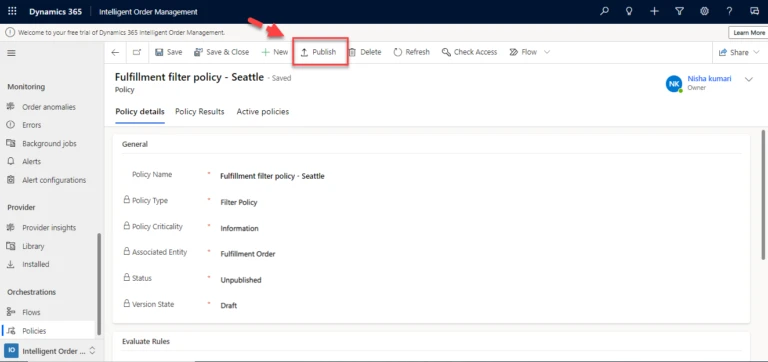
5. Select Publish.
5. Fulfillment filter policy - Chicago
- To create a filter policy for the Chicago store, follow these steps.
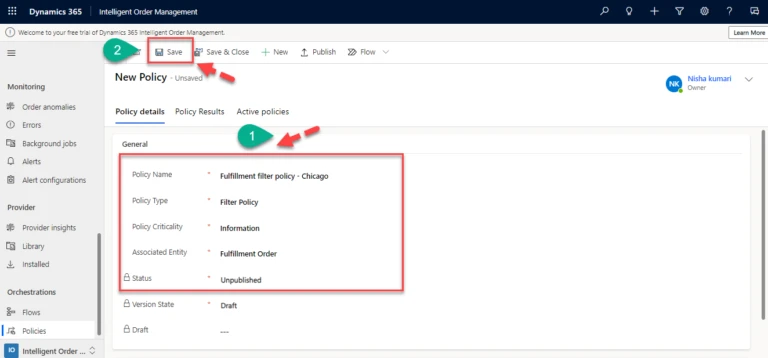
- Go to Orchestration > Policies and select New.
- For Policy Name, enter “Fulfillment filter policy – Chicago”.
- For Policy Type, enter “Filter Policy”.
- For Policy Criticality, enter “Information”.
- For Status, enter “Unpublished”.
- For Associated Entity, enter “Fulfillment Order”.
- Select Save.
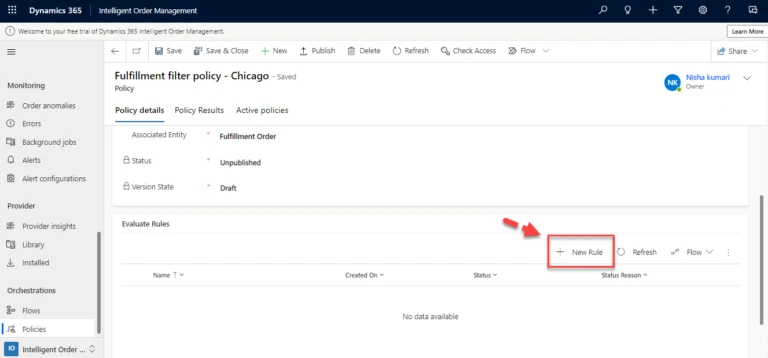
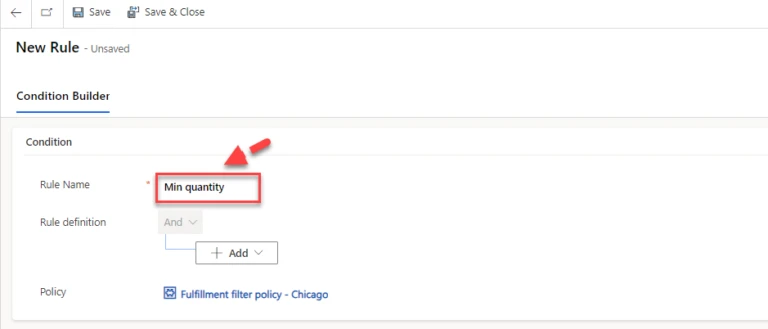
2. On the Fulfillment filter policy – Chicago form, select New Rule.
3. Under Condition, for Rule Name, enter “Min quantity”.
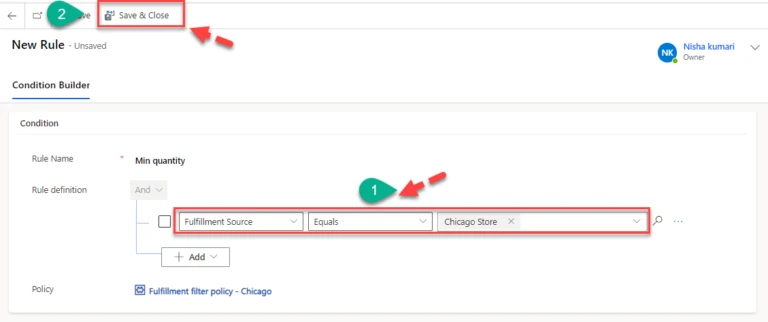
4. For Rule definition:
- In the first field, select Fulfillment Source.
- In the second field, select Equals.
- In the third field, enter or select Chicago store.
- Select Save and close.
5. Select Publish.
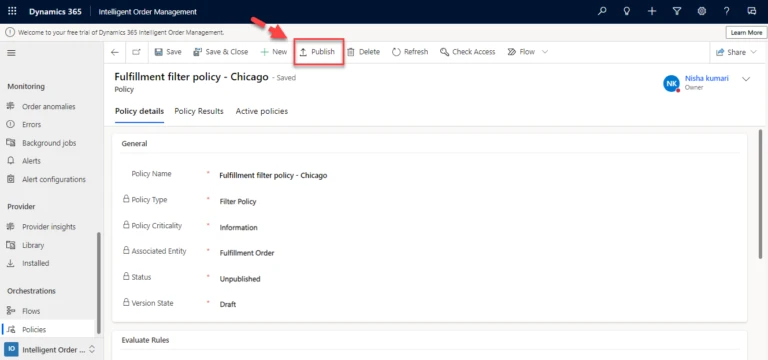
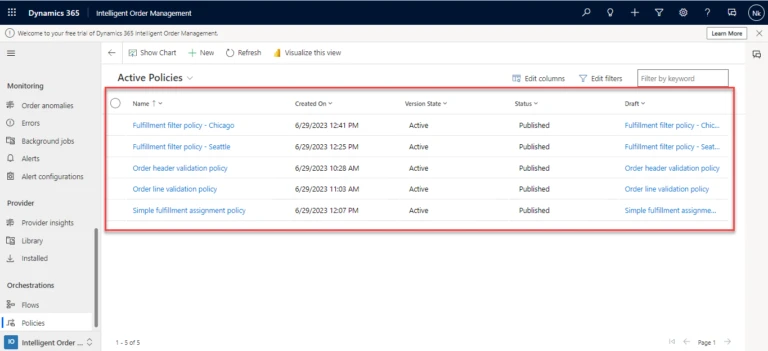
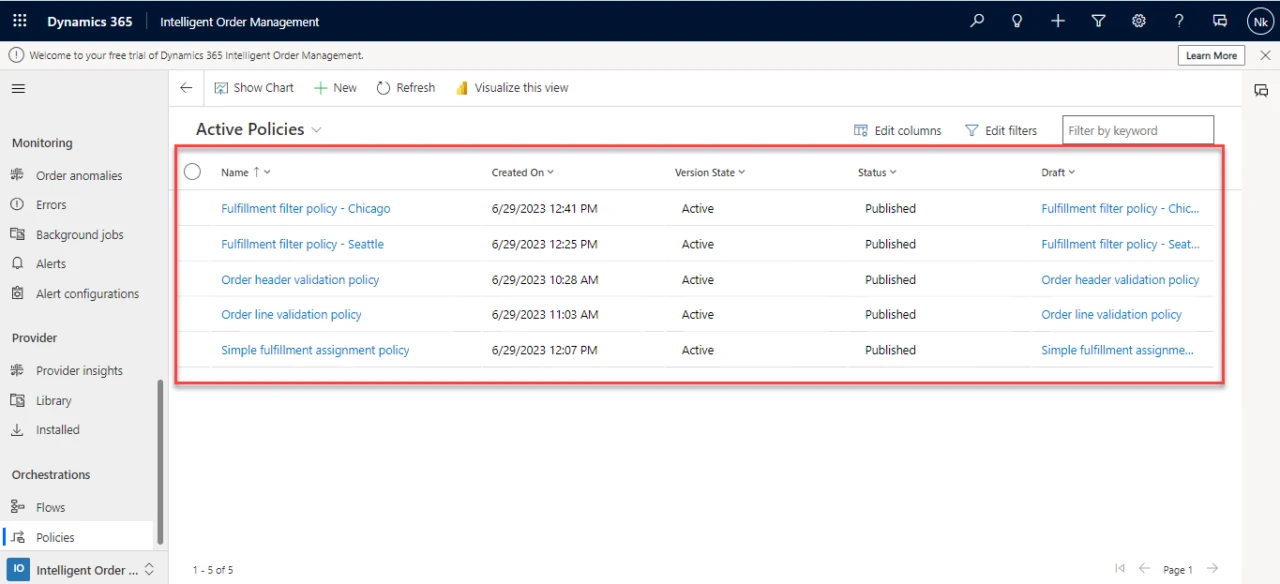
As you can see all the five policies is created Succesfully