Microsoft Dynamics 365 Intelligent Order Management IOM Step by Step Tutorial
Step 1 - COMPLETEDCreate the free 30 Days Trial Version Environment for the Microsoft Dynamics 365 Intelligent Order Management
Step 2 - COMPLETEDSet up an IOM environment / Configure platform connection references in Microsoft Dynamics 365 Intelligent order Management
Step 3 - COMPLETEDCreate a new solution for PROVIDER Customization in Microsoft Dynamics 365 IOM / Create a provider solution
Step 4 - COMPLETEDCreate RequestBin Custom connector (Power Platform) for Step by Step Microsoft IOM Tutorial
Step 5 - COMPLETEDCreate new intake provider definition for Step by Step IOM Tutorial Scenario- Microsoft Dynamics 365 Intelligent Order Management / Register a new Provider in Library
Step 6Create a provider message request handler for Quick Start Lab Scenario for Microsoft Intelligent order Management IOM tutorial
Step 7Create Fulfillment provider in Microsoft Dynamics Intelligent Order Management IOM – Order to Fulfillment in IOM
Step 8Add a provider definition logic definition to the Outlook Provider Definition in Microsoft Dynamics Intelligent Management IOM
Step 9Create a provider action - Power Automate Flow - to send a fulfillment Order payload to RequestBin
Step 10Activate the Intake, Fulfillment, & Internal Application Service provider created in Previous Step by Step IOM Tutorial
Step 11Create Orchestration policies and their associated rules for Quick Start Lab Scenario in Microsoft Dynamics 365 Intelligent Order Management IOM
Step 12Create Sales Order Orchestration flow in Microsoft Dynamics Intelligent Order Management IOM
Step 13Set up Customer(Account) and product mapping in Microsoft Dynamics Intelligent order Management IOM
Step 14Run a sample order orchestration flow in Microsoft Dynamics 365 Intelligent Order Management - END TO END DEMO IOM
Create a provider message handler for step by step IOM Tutorial STEP 6 - Quick Start Lab
To create a provider message handler, follow these steps.
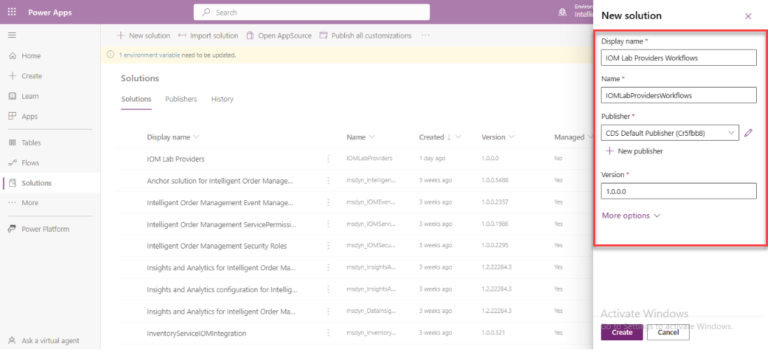
- Go to the Power App Maker portal, navigate to Solutions, and create new Solution named IOM Lab Provider Workflows .
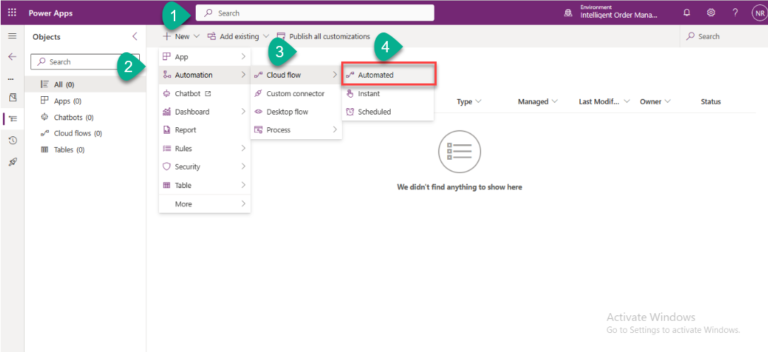
2. Select New > Automation > Cloud Flow > Automated,
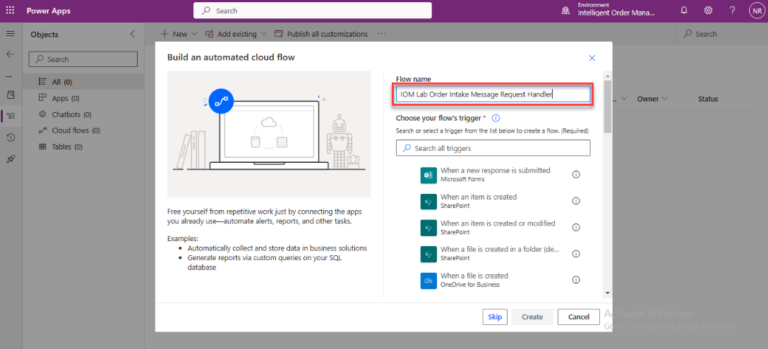
3. Select Cloud Flow, and name it “IOM Lab Order Intake Message Request Handler”.
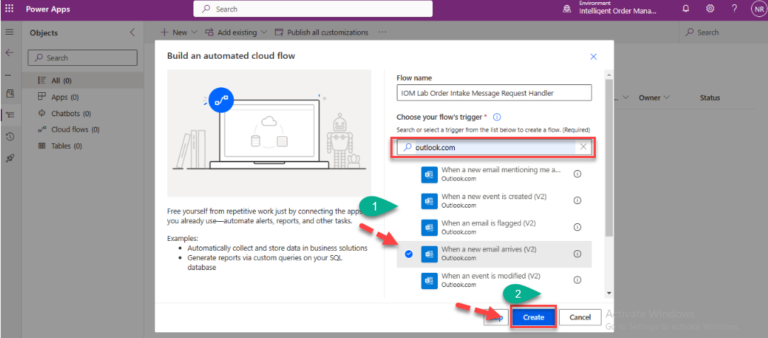
4. Search for the trigger type as Outlook.com – When a new email arrives (V2), and click on Create then sign in with your outlook.com account credentials.
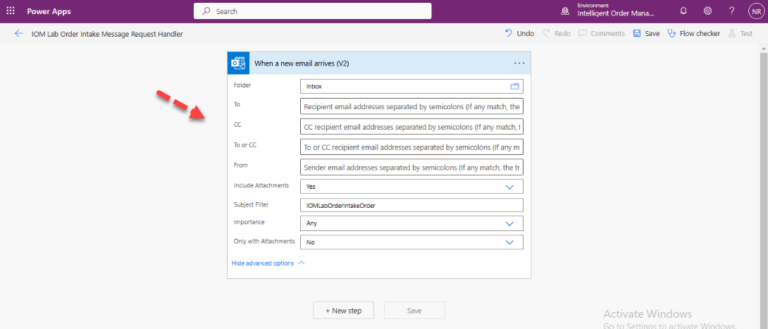
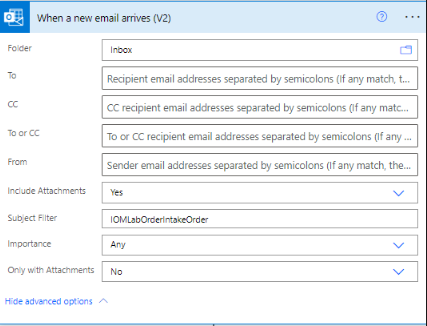
5. Enter the required information in the field
- For Folder, select Inbox.
- For To, select Recipient email addresses separated by semicolons.
- For CC, select CC recipient email addresses separated by semicolons.
- For To or CC, select To or CC recipient email addresses separated by semicolons.
- For From, select Sender email addresses separated by semicolons.
- For Include Attachments, select Yes.
- For Subject Filter, select IOMLabOrderIntakeOrder.
- For Importance, select Any.
- For Only with Attachment, select No.
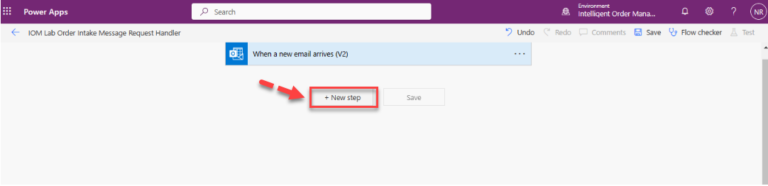
6. Select New step .
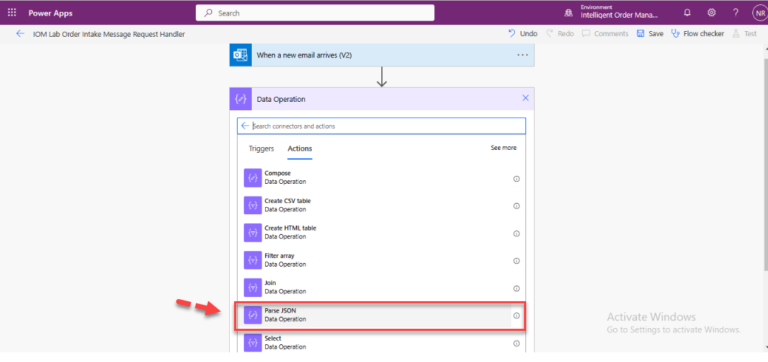
7. Search for Data Operations Add “Parse JSON“.
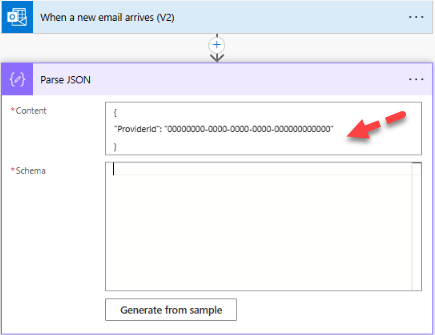
8. Paste the Code in the Content given below
{
"ProviderId": "00000000-0000-0000-0000-000000000000"
}
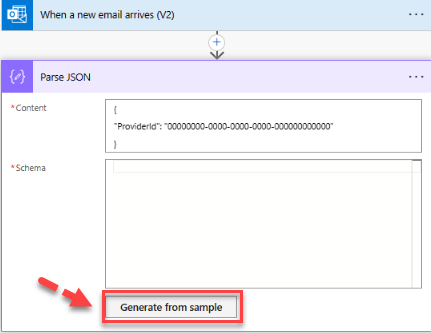
9. In the Schema field click on Generate from Sample.
10. Copy the same sample code that you paste it into the Content Field and click on done.
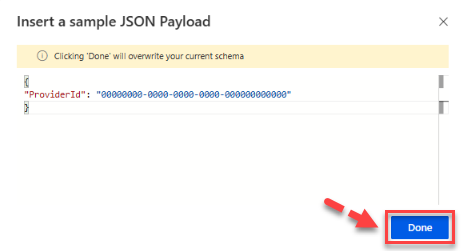
11. As you can see the sample code is converted into the Sample Schema Code in JSON format.
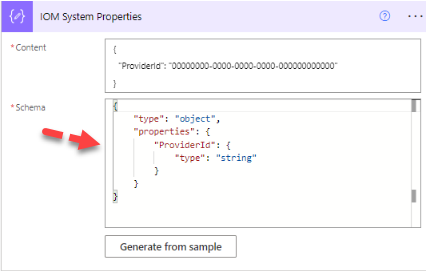
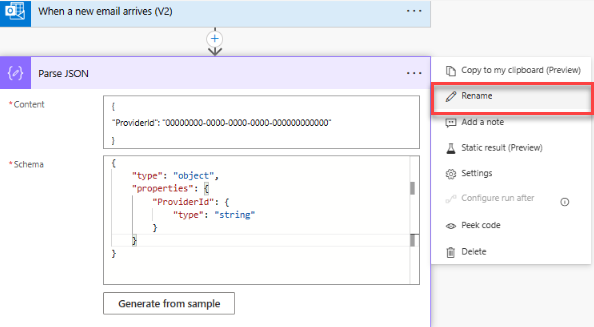
12. Select the ellipsis (“…“) and then select Rename.
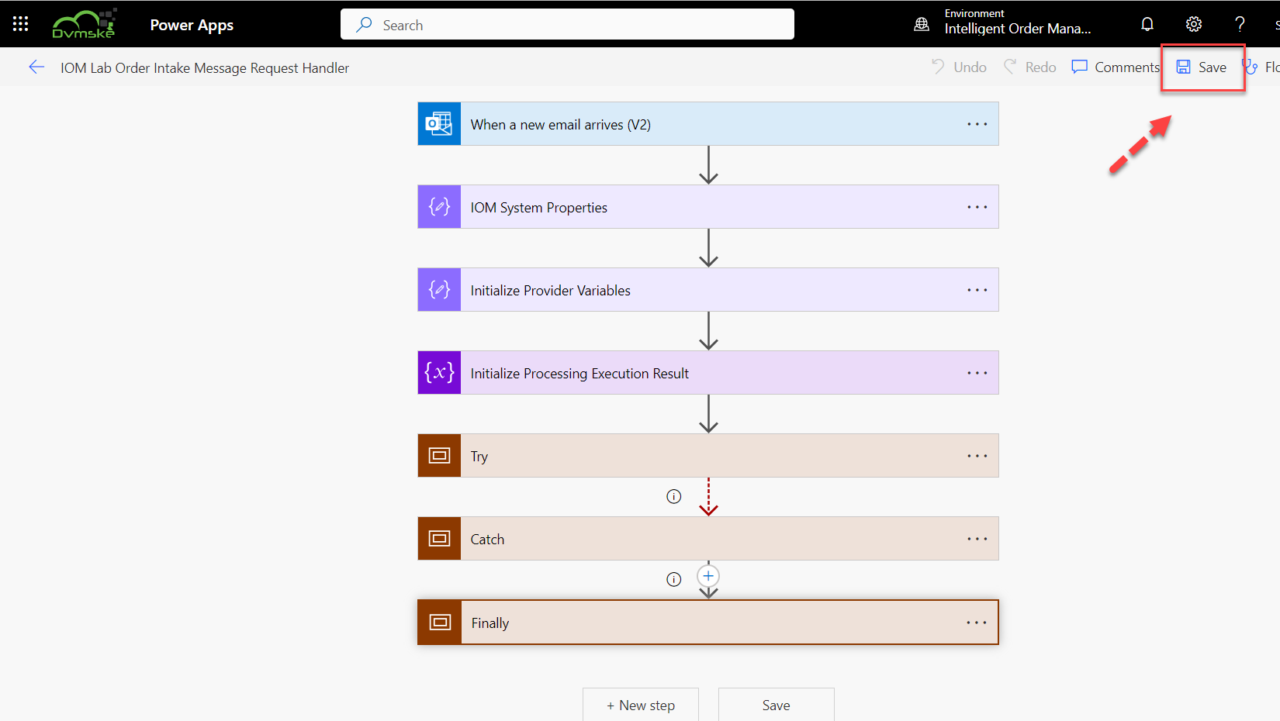
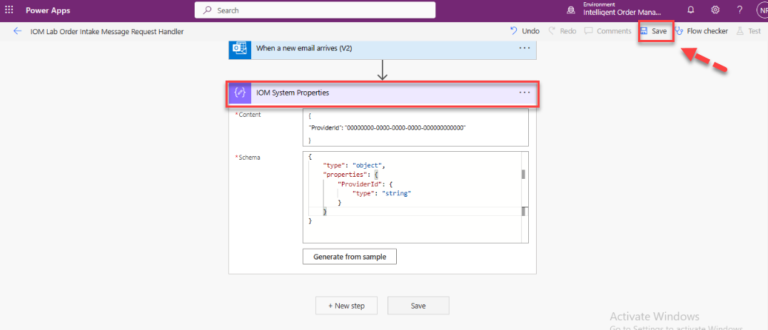
13. Rename the action “IOM System Properties” and click on Save .
14. Select New step, add a Parse JSON action, and rename to “Initialize Provider Variables“.
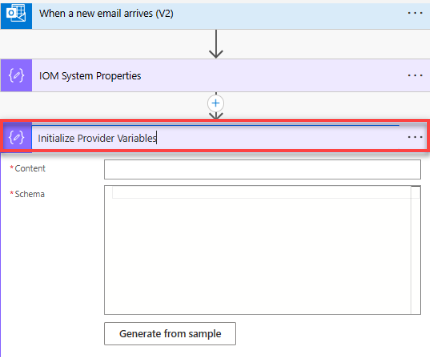
15. In the Content, paste the below code:
{
"SourceObjectName": "IOMLabOrderIntakeProvider",
"DestinationObjectName": "Dataverse Order"
}
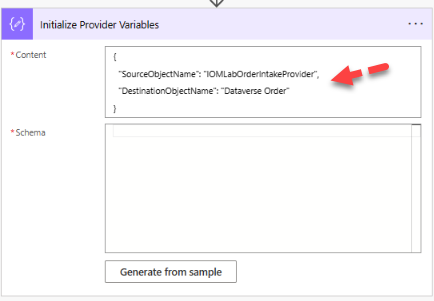
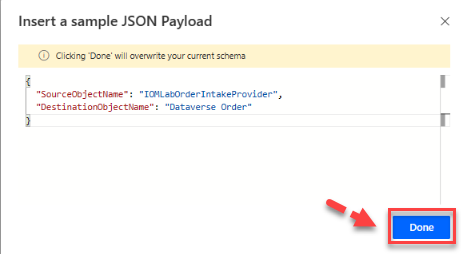
16. Copy the same sample code that you paste it into the Content Field and click on Done.
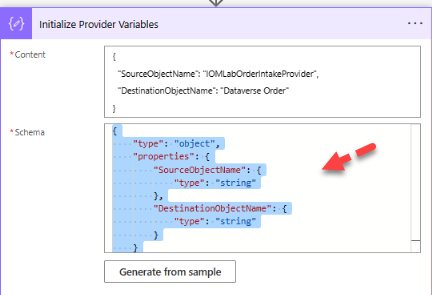
17. As you can see the sample code is converted into the Sample Schema Code in JSON format.
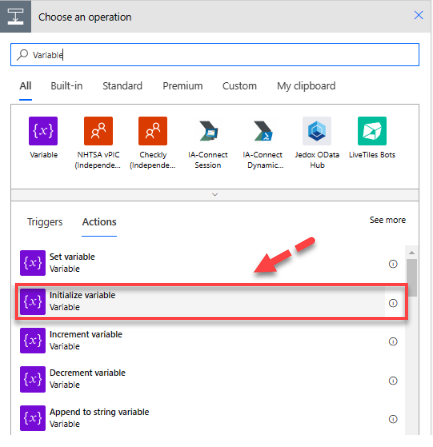
18. Select New step search for Variables Add Initialize variable action,
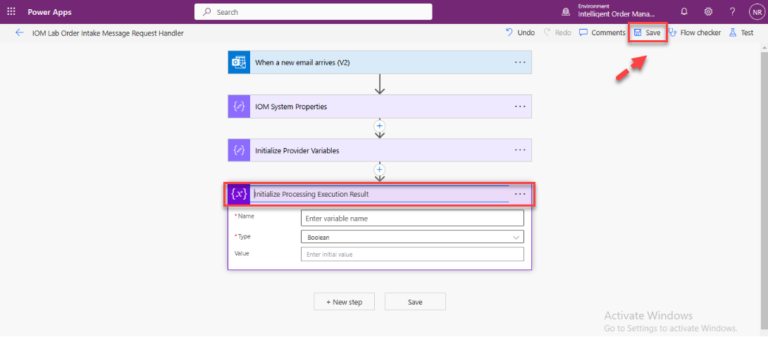
19. Rename the action “Initialize Processing Execution Result” and click on Save
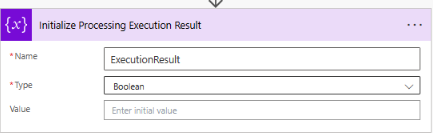
20. Enter the Name “ExecutionResult” and for Type, select Boolean.
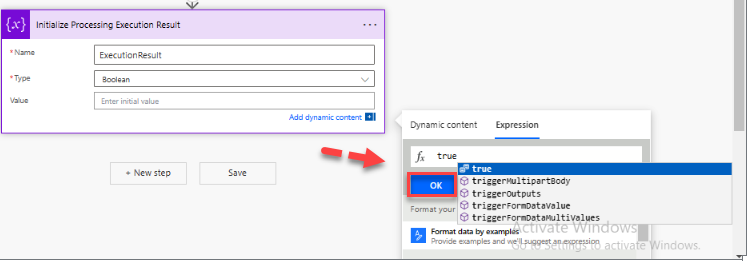
21. Enter the Value, select true from the Expression and click on OK.
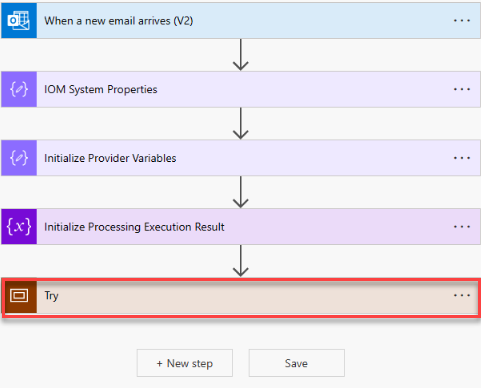
22. Select New step, search for Control and add “scope”
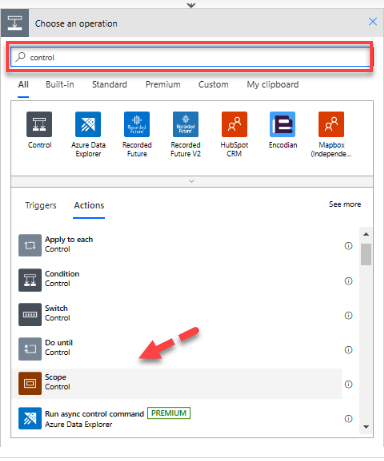
23. Rename the scope to ‘ Try ‘.
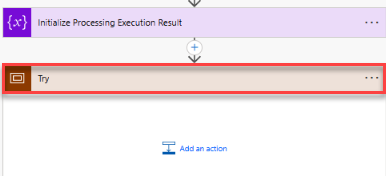
24. In the Try scope, select Add an action then search for Microsoft Dataverse Connector select “perform an unbound action” .
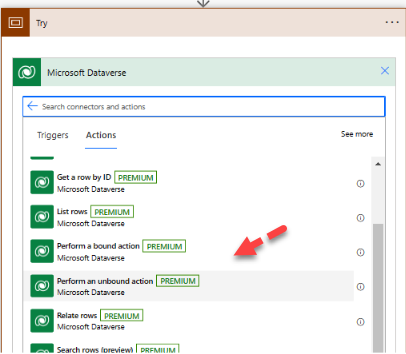
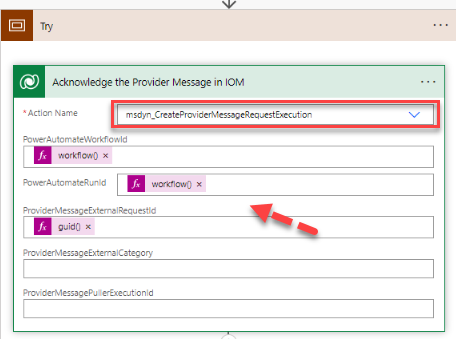
25. Rename it “Acknowledge the Provider Message in IOM“.

26. Enter the appropriate details in the respective fields.
- For Action Name, enter “msdyn_CreateProviderMessageRequestExecution”.
- For PowerAutomateWorkflowId, copy the given below expression
workflow()['tags']['xrmWorkflowId']3.For PowerAutomateRunId, copy the given below expression
workflow()['run']?['name']4.For ProviderExternalRequestId, copy the given below expression.
guid()5.Select Save.
27. Select Add an action, search for Control Connector and then add an Apply to each control.
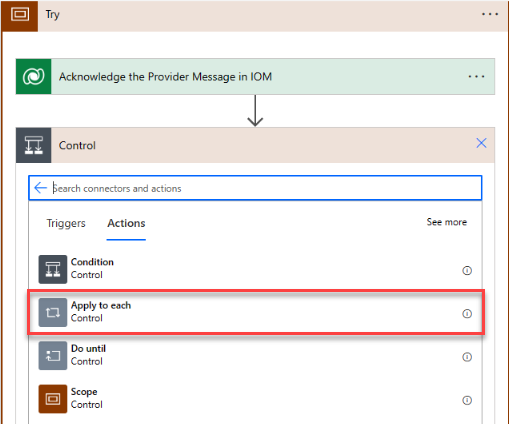
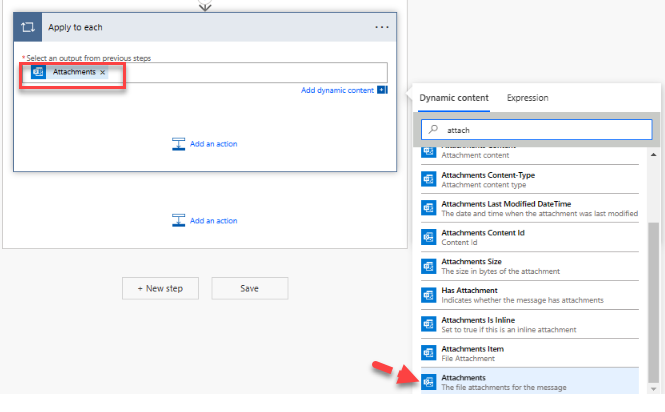
28. For Select an output from the previous steps, select Attachments.
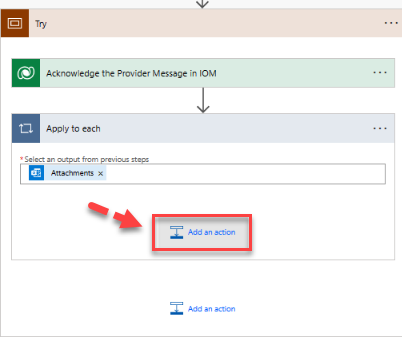
29. Select Add an action within the Apply to each loop
30. Search for Flow connector and Add Run a child flow .
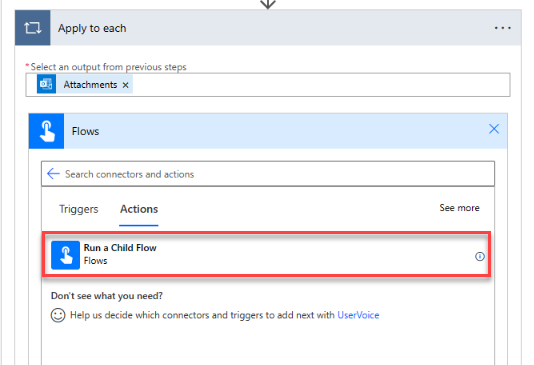
31. Rename it “Transform Message with Power Query Online“.
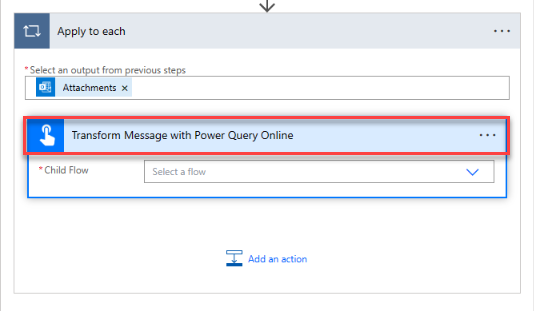
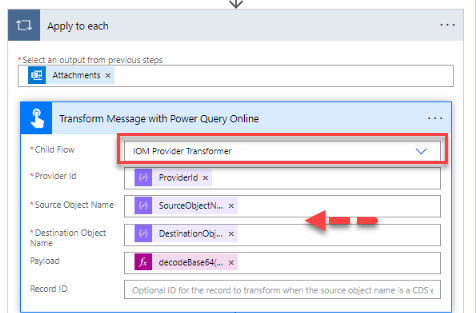
32. Enter the appropriate details in required fields.
- Select the child flow IOM Provider Transformer.
- For Provider Id, select the ProviderId variable.
- For Source Object Name, select the SourceObjectName variable.
- For Destination Object Name, select the DestinationObjectName variable.
- For Payload, copy the given below expression .
decodeBase64(items('Apply_to_each')?['ContentBytes'])6.Select Save.
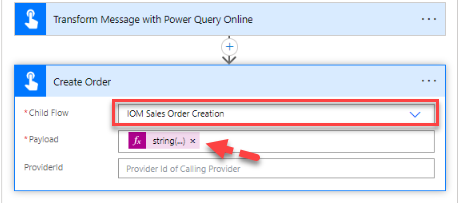
33. After the transformation step, select Add an action, add Run a child flow from the Flow connector, and rename it “Create Order“.
- For Child Flow, enter “IOM Sales Order Creation”.
- For Payload, copy the given below expression
string(json(outputs('Transform_Message_with_Power_Query_Online')?['Body']?['result'])?[0][0])3. Select Save.
34. Collapse the Try scope by selecting its title bar.
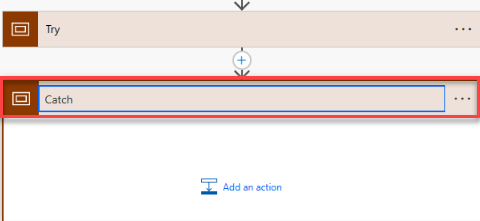
35. Select New step, add a scope and rename it “Catch“.
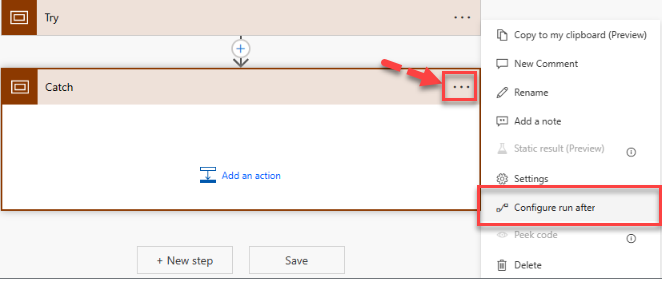
36. In the Catch scope, select the ellipsis (“…“), and then select Configure run after.
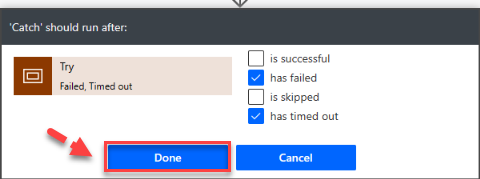
37. Select the has failed and has timed out checkboxes, and then select Done.
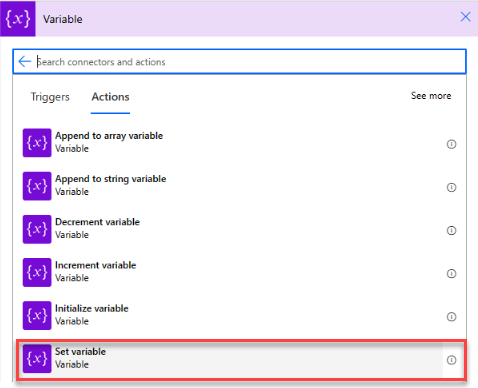
38. In the Catch scope, select Add an action, search for Variable and add a Set variable action.
39. Rename it “Set the execution result to failed“.
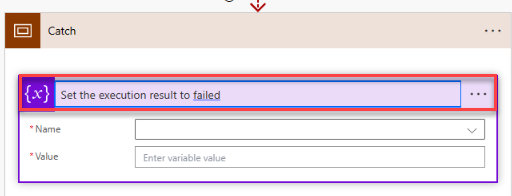
40. For Name, enter “Executionresult” and in the Value, select False.
41. Collapse the Catch scope by selecting its title bar.
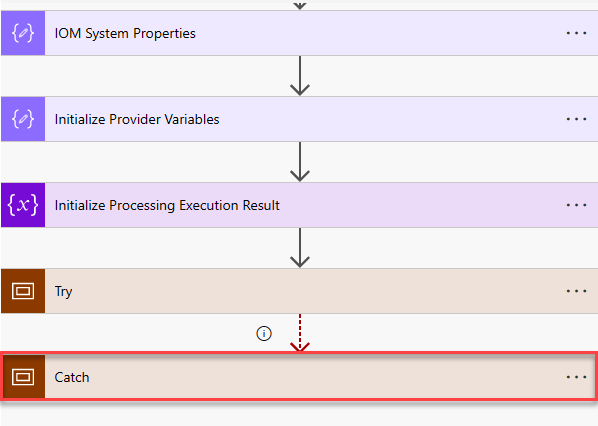
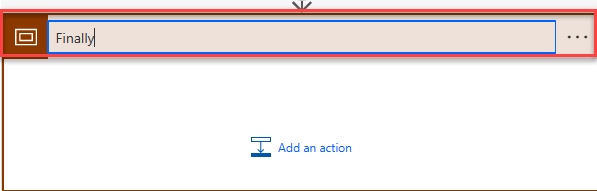
42. Select New step, add a scope and rename it “Finally“.
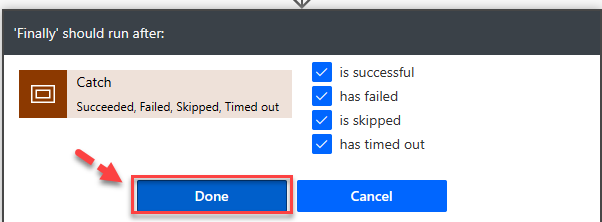
43. In the Finally scope, select the ellipsis (“…“), and then select Configure run after.
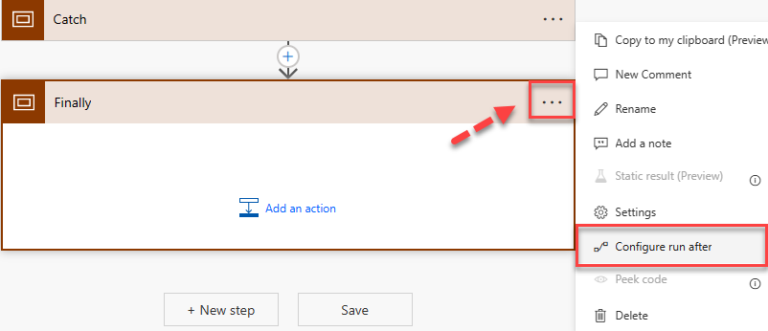
44. Select the is successful, has failed, is skipped, and has timed out checkboxes, and then select Done.
45. In the Finally scope, select Add an action, add a Perform an unbound action and rename it “Save Provider message request execution result”.
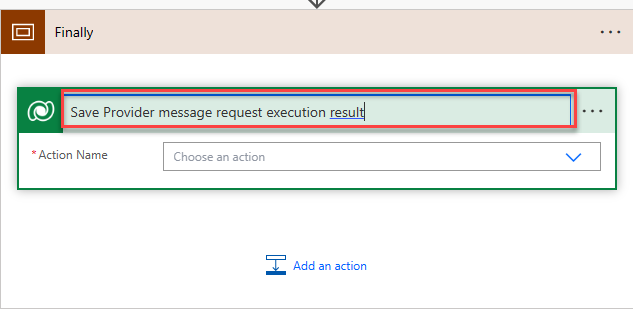
46. For Action Name, enter “msdyn_UpdateProviderMessageRequestStatus”.and For ProviderMessageRequestExecutionId, copy the given below expression
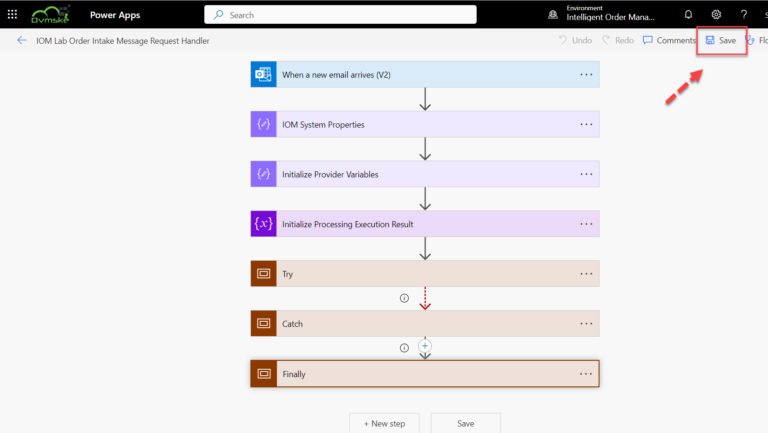
@outputs('Acknowledge_the_Provider_Message_in_IOM')?["body/ProviderMessageRequestExecutionId']47. Click on Save.
Add provider definition logic definition to the provider definition for Quick Start Lab Scenario
To add a provider definition logic definition to the provider definition, follow these steps.
- In your Intelligent Order Management application, go to Providers > Catalog.
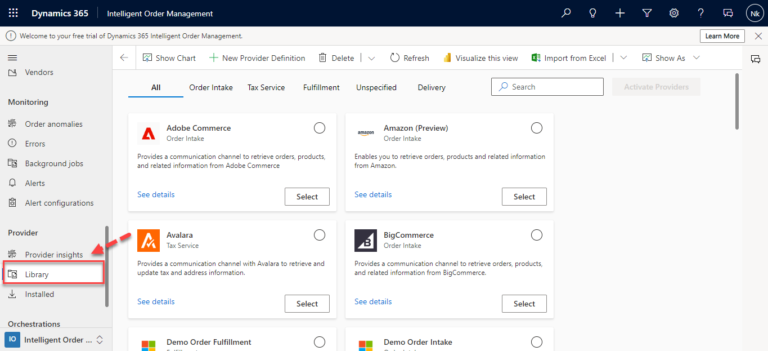
2. Select the newly-created IOMLabOrderIntakeProvider and click on See details.
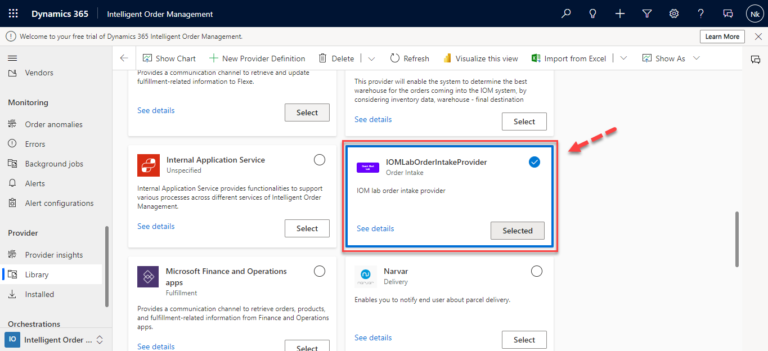
3. Select the Logic definitions tab.
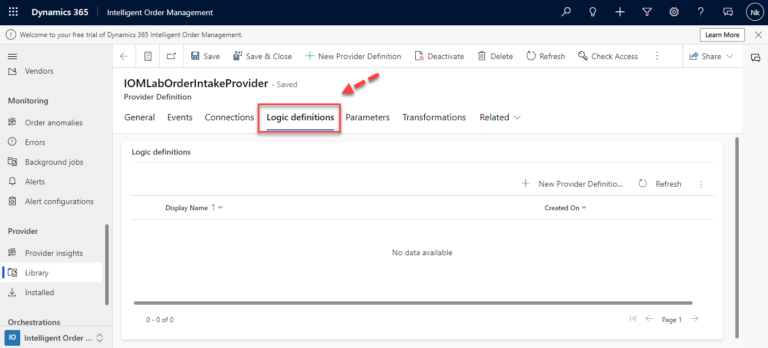
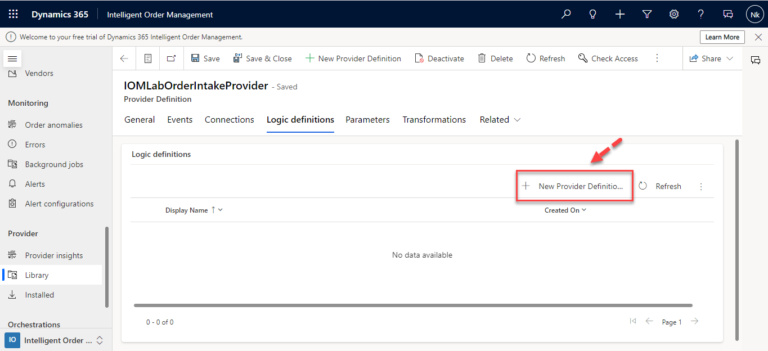
4. Select + New IOM Provider Definition Logic Definition.
5.In the New Provider Definition Logic Definition dialog box, do the following:
- For Display Name, enter “IOM Lab Order Intake Message Request Handler”.
- For Logical Name, enter “msdyn_LabOrderIntakeMessageRequestHandler”.
- For Provider Definition, enter “IOMLabOrderIntakeProvider”.
- For Logic Type, enter “Provide Message Handler”.
- For Workflow Name, enter “IOM Lab Order Intake Message Request Handler”.
- For Timeout Minutes, enter “2”.
- For Max Retry Attempts, enter “3”.
- For Description, enter “IOM Lab Order Intake Message Request Handler”.
- Select Save.
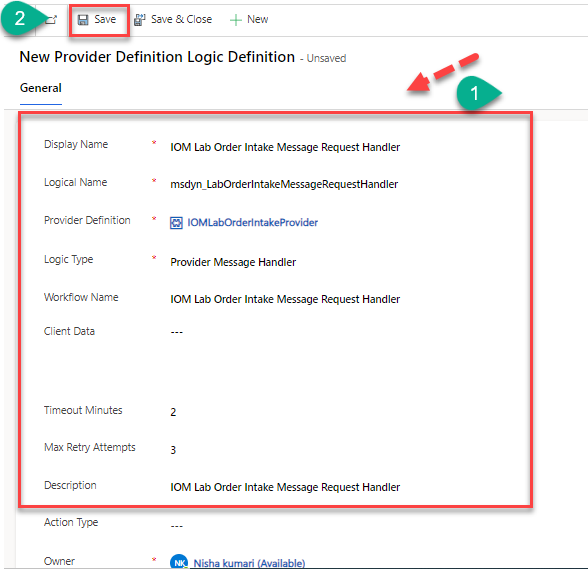
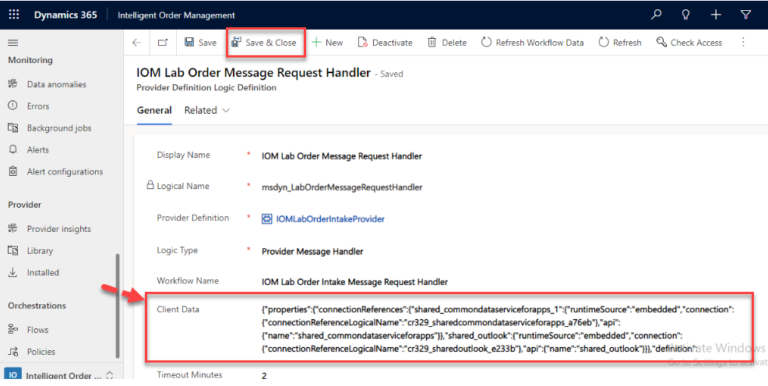
6. After click on Save button will generates a JSON representation of the message handler cloud flow and fills in the Client Data field and Select Save & close.
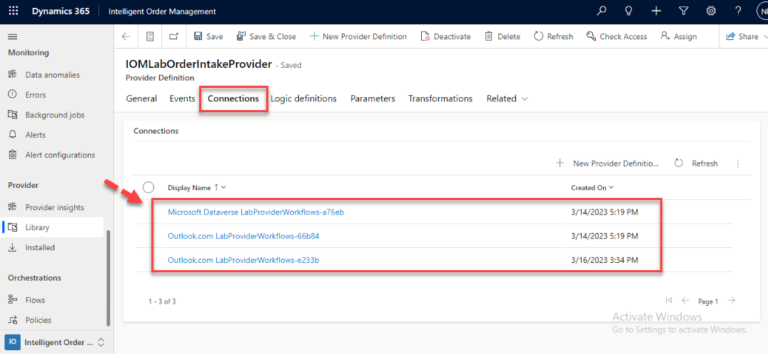
7. Select Connections. You should see both the Microsoft Dataverse and Outlook.com connection reference definitions listed.
Add provider definition logic definition and connection reference to IOMLabProviders solution
To add a provider definition logic definition and connection reference to the IOMLabProviders solution, follow these steps.
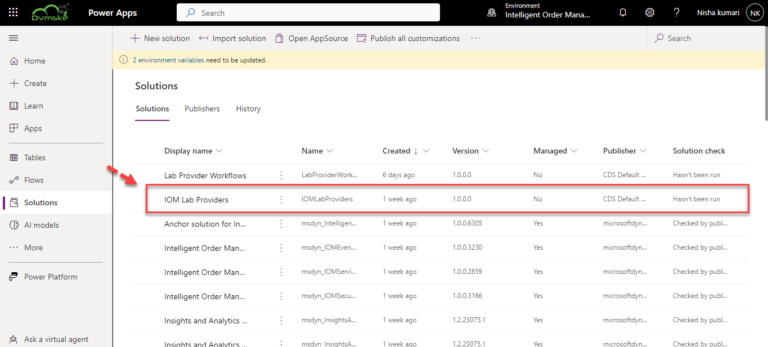
- Go to the Power App Maker portal and navigate to the newly-created solution IOMLabProviders.
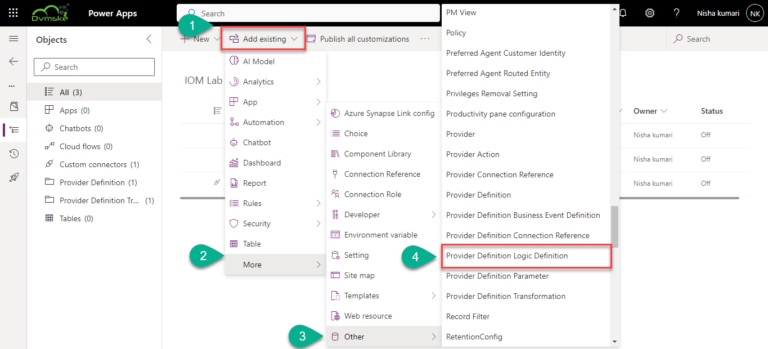
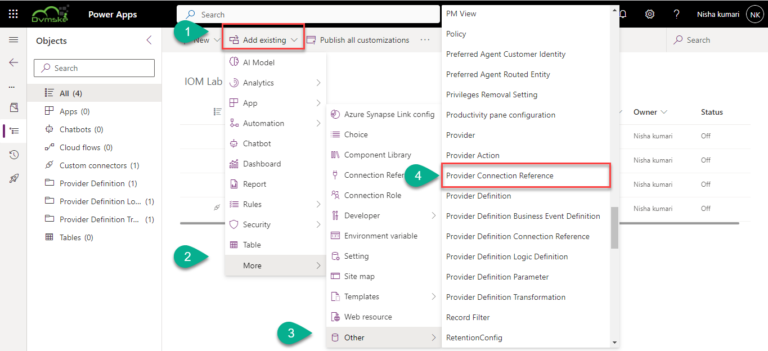
2. Select Add existing > More > Other > Provider Definition Logic Definition.
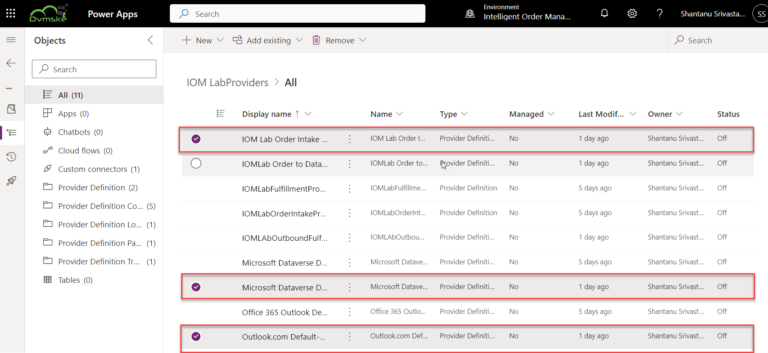
3. Select IOM Lab Order Intake Message Request Handler and then select Add to add it to the solution.
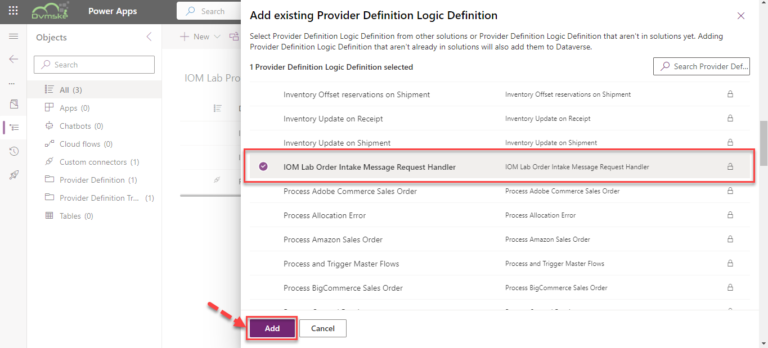
3. Select IOM Lab Order Intake Message Request Handler and then select Add to add it to the solution.
4. Select Add existing > More > Other > Provider Connection Reference.
5. Select the Microsoft Dataverse and Outlook.com connection reference definitions and then select Add to add them to the solution.
6. As you can see all three are added into the solution.