Make a field read only and editable in Dynamics 365 using set Disabled
In Dynamics 365, We can use the JavaScript method setDisabled to make a field readonly(lock) and editable(unlock). These new methods are very useful so that developers can easily lock/unlock a field.
Scenario
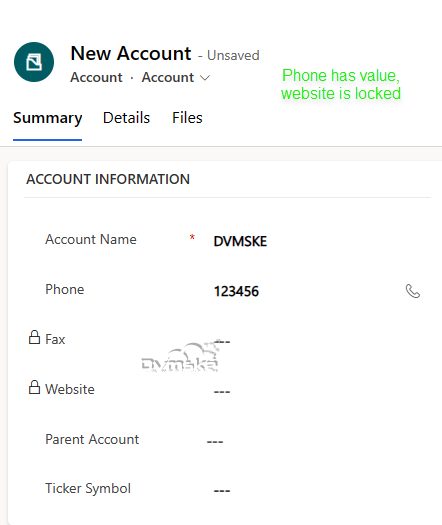
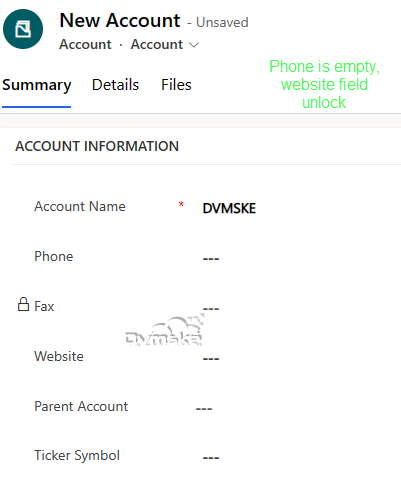
- We have a requirement to lock the website field if phone field has value and if phone field is empty the unlock the website field.
- On Change of Phone, JavaScript will execute setDisabled function on Account Entity and make the field lock and unlock as per our business requirements.
- JavaScript (Event Handler) will be added on Account entity and OnChange Event of Phone. So JavaScript function will trigger on change of Phone field.

Syntax
Below is the latest syntax available for lock/unlock fields in Dynamics 365 Online V9.X using JavaScript.
formContext.getControl(arg).setDisabled(bool);
Example:
formContext.getControl("websiteurl").setDisabled(true); //to lock a field
formContext.getControl("websiteurl").setDisabled(false);// to unlock a field
Parameters
| Name | Type | Required | Description |
| bool | Boolean | Yes | Specify true or false to disable or enable the control. |
setDisabled Example
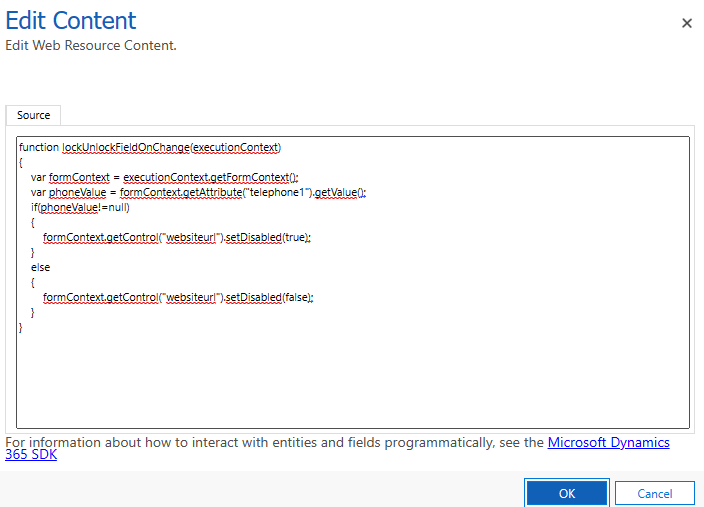
Below is the JavaScript function “lockUnlockFieldOnChange”
- 1st create form context from execution context passed as 1st parameter
- Get the phone value, if field is not null
- If phone contains value lock the website field
- If Phone is empty unlock the website field
function lockUnlockFieldOnChange(executionContext)
{
    var formContext = executionContext.getFormContext();
    var phoneValue = formContext.getAttribute("telephone1").getValue();
    if(phoneValue!=null)
    {
        formContext.getControl("websiteurl").setDisabled(true);
    }
    else
    {
        formContext.getControl("websiteurl").setDisabled(false);
    }
}
How to Register JavaScript on OnChange Event of Form
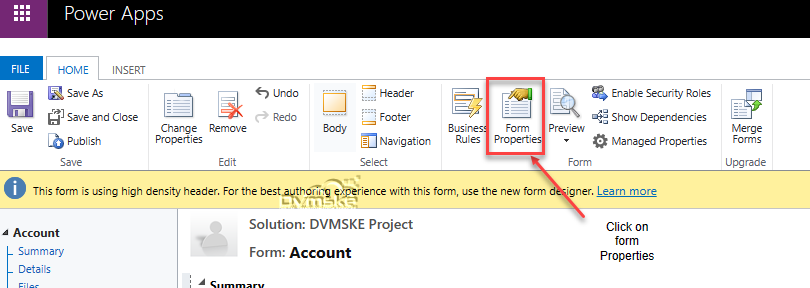
- Create a New Solution and Name it appropriately, In your solution, add account entity then select account form.
- From component section select account entity added and open Form editor
- From Fom editor , click on Form Properties.
- Either Create new Web Resource or add JavaScript Function to existing Web Resource.
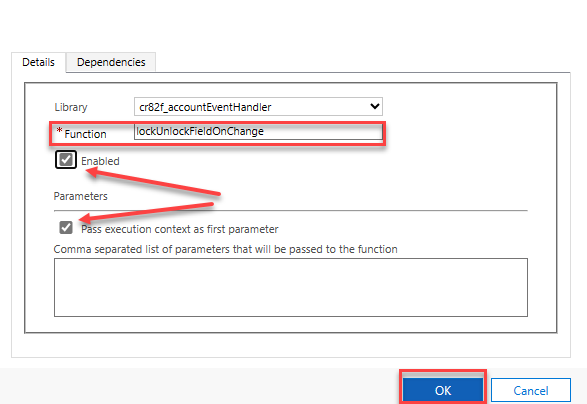
- In the event handler, in control select the “Phone” field and event as on change. Click on add.

- In the library select the library where you add your code. And in function copy your js function. And check both the checkboxes. Click on ok.
- Click on save and publish. Wait until publish.
OUTPUT