Microsoft Dynamics 365 Intelligent Order Management IOM Step by Step Tutorial
Step 1 - COMPLETEDCreate the free 30 Days Trial Version Environment for the Microsoft Dynamics 365 Intelligent Order Management
Step 2 - COMPLETEDSet up an IOM environment / Configure platform connection references in Microsoft Dynamics 365 Intelligent order Management
Step 3 - COMPLETEDCreate a new solution for PROVIDER Customization in Microsoft Dynamics 365 IOM / Create a provider solution
Step 4 - COMPLETEDCreate RequestBin Custom connector (Power Platform) for Step by Step Microsoft IOM Tutorial
Step 5 - COMPLETEDCreate new intake provider definition for Step by Step IOM Tutorial Scenario- Microsoft Dynamics 365 Intelligent Order Management / Register a new Provider in Library
Step 6 - COMPLETEDCreate a provider message request handler for Quick Start Lab Scenario for Microsoft Intelligent order Management IOM tutorial
Step 7 - COMPLETEDCreate Fulfillment provider in Microsoft Dynamics Intelligent Order Management IOM – Order to Fulfillment in IOM
Step 8 - COMPLETEDAdd a provider definition logic definition to the Outlook Provider Definition in Microsoft Dynamics Intelligent Management IOM
Step 9 - COMPLETEDCreate a provider action - Power Automate Flow - to send a fulfillment Order payload to RequestBin
Step 10 - COMPLETEDActivate the Intake, Fulfillment, & Internal Application Service provider created in Previous Step by Step IOM Tutorial
Step 11 - COMPLETEDCreate Orchestration policies and their associated rules for Quick Start Lab Scenario in Microsoft Dynamics 365 Intelligent Order Management IOM
Step 12Create Sales Order Orchestration flow in Microsoft Dynamics Intelligent Order Management IOM
Step 13Set up Customer(Account) and product mapping in Microsoft Dynamics Intelligent order Management IOM
Step 14Run a sample order orchestration flow in Microsoft Dynamics 365 Intelligent Order Management - END TO END DEMO IOM
PREVIOUS STEP 11 - COMPLETEDCreate Orchestration policies and their associated rules for Quick Start Lab Scenario in Microsoft Dynamics 365 Intelligent Order Management IOM
Create Order orchestration flow for your order journey
- In this blog we will describes the steps required to create order orchestration in Microsoft Dynamics 365 Intelligent Order Management.
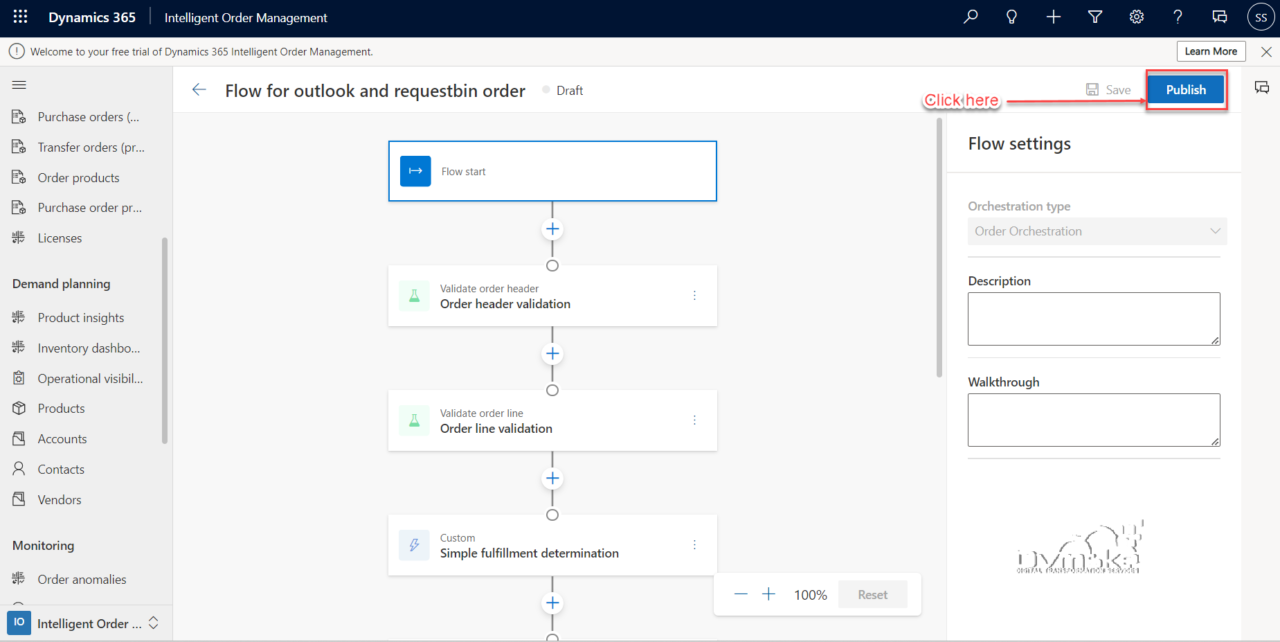
- Open Your IOM Application and select “flows” under Orchestration.
- Click on New > Name the flow and select Order Orchestration > Create.

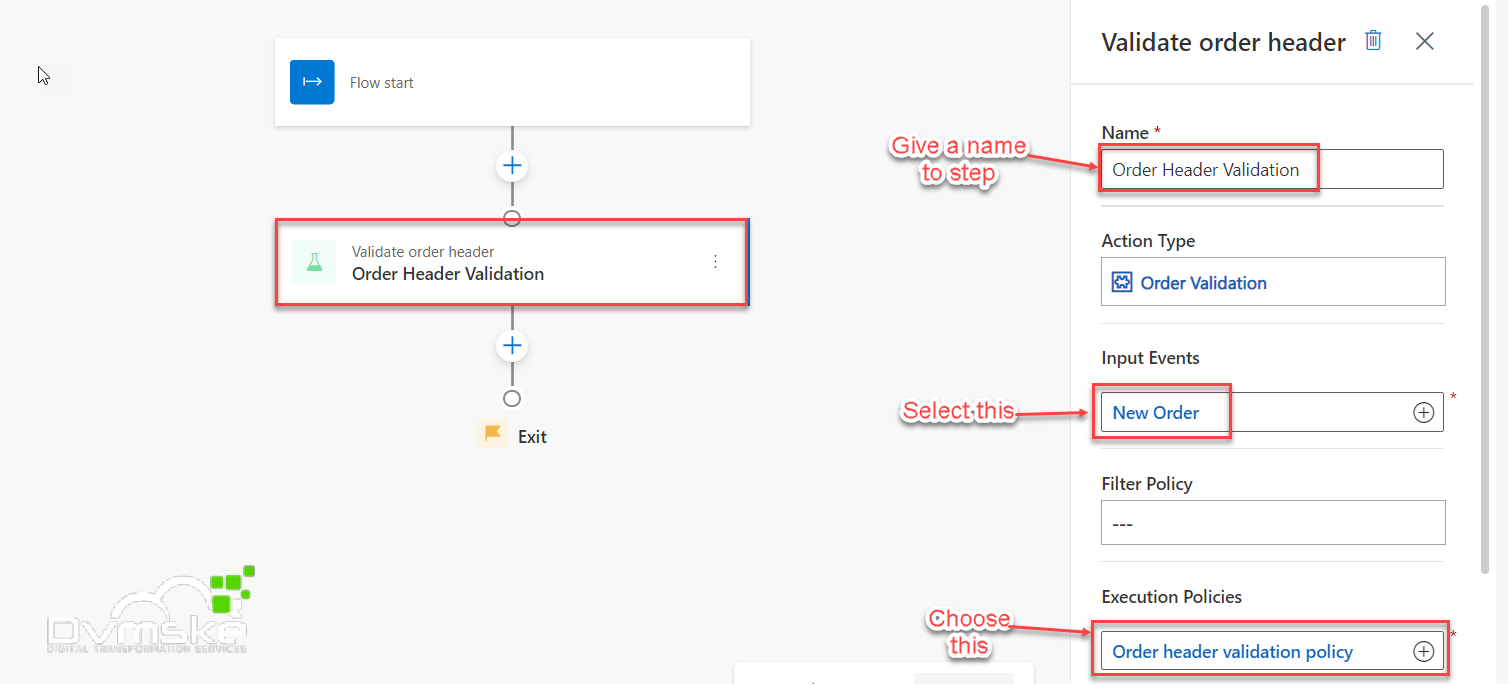
Step1-Add the order header Validation tile
- For adding the Validate order header tile, follow these steps:
- Go to Orchestration > Flows and select New.
- Enter a name for your new flow, and then select Save.
- Select the plus symbol (“+”) and then add the Validate order header tile.
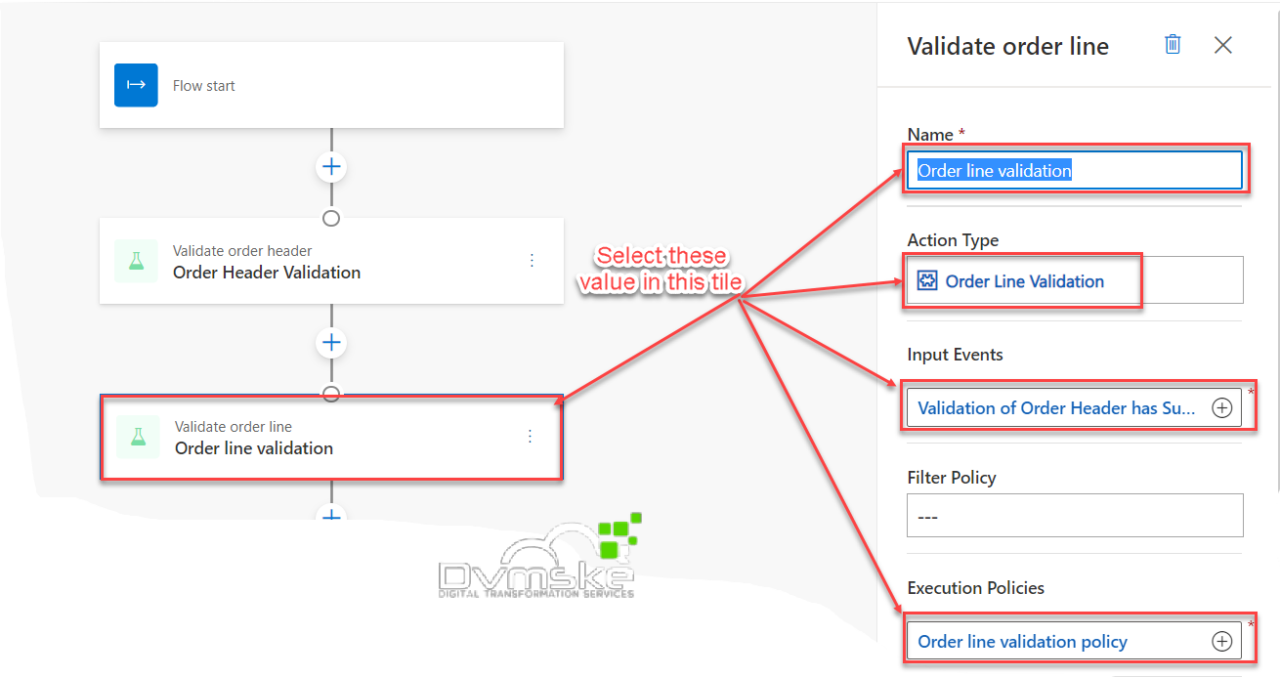
Step2-Add the Validate order line tile
- To add the Validate order line tile, follow these steps.
- Go to Orchestration > Flows and select New.
- Select the plus symbol (“+”) and then add the Validate order line tile.
- In the Validate order line dialog box, do the following:
a.For Name, enter “Order line validation”.
b.For Action Type, enter “Order Line Validation”.
c.For Input Events, enter “Validation of Order Header has Succeeded”.
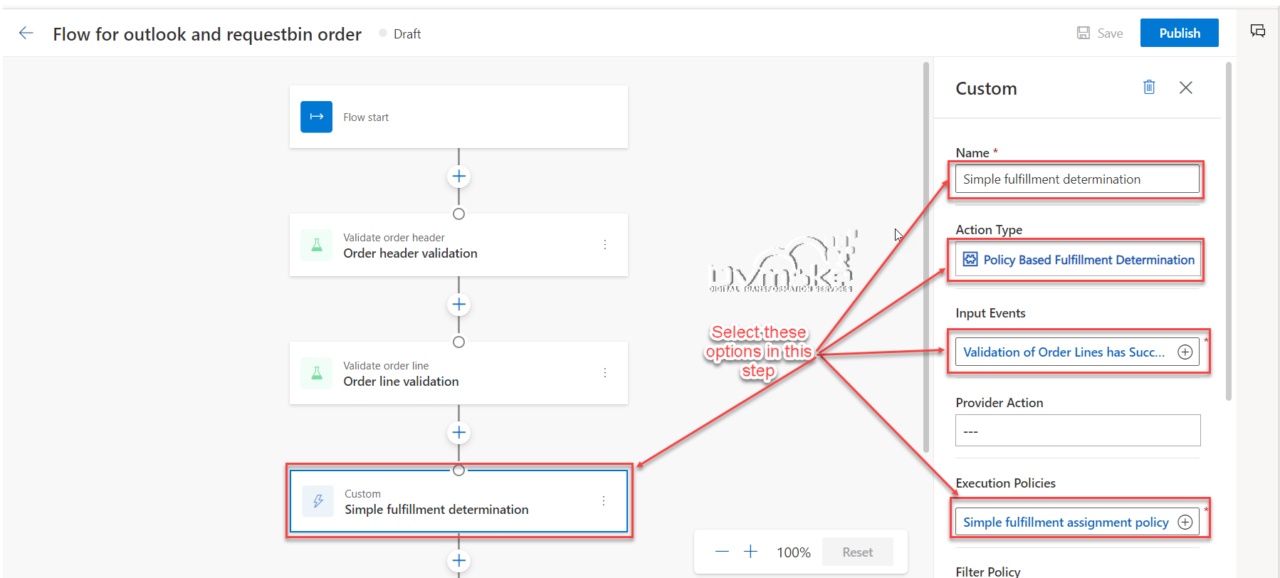
Step3-Add a Custom tile
- To add a Custom tile, follow these steps.
- Go to Orchestration > Flows and select New.
- Select the plus symbol (“+”) and then add a Custom tile.
- In the Custom dialog box, do the following:
a.For Name, enter “Simple fulfillment determination”.
b.For Action Type, enter “Policy Based Fulfillment Determination”.
c.For Input Events, enter “Validation of Order Lines has Succeeded”.
d.For Execution Policies, enter “Simple fulfillment assignment policy”.
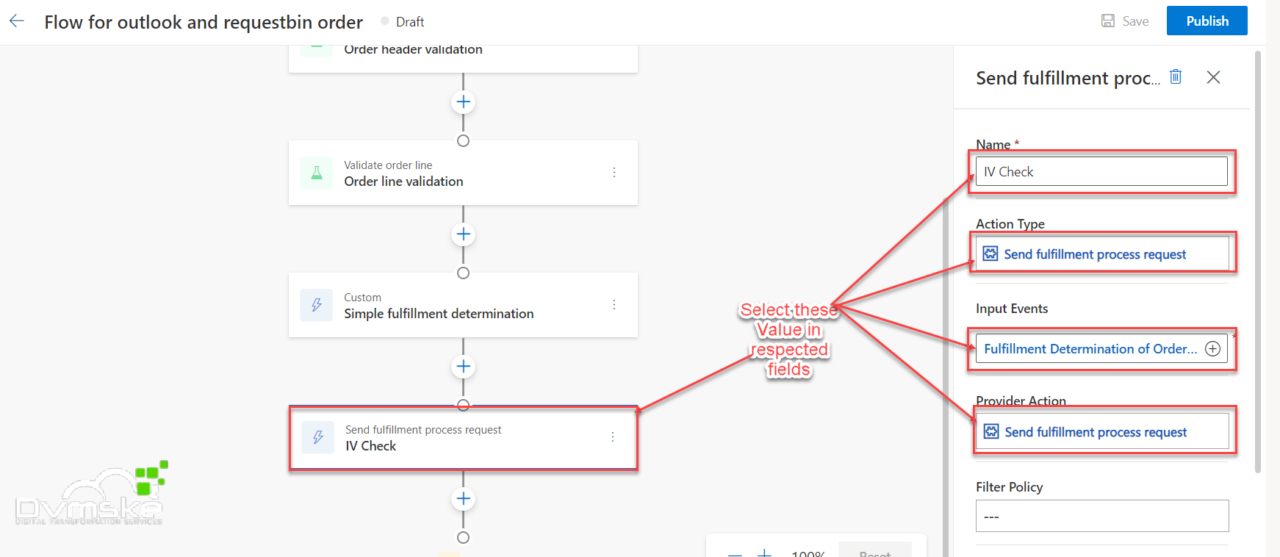
Step4-Add a Send fulfillment process request
- To add a Send fulfillment order request tile, follow these steps.
- Go to Orchestration > Flows and select New.
- Select the plus symbol (“+”) and then add a Send fulfillment order request tile.
- In the Send fulfillment order request dialog box, do the following:
a.For Name, enter “IV Check”.
b.For Action Type, enter “Send fulfillment process request”.
c.For Input Events, enter “Fulfillment Determination of Order Succeeded”.
d.For Provider Action , enter “Send fulfillment process request”.
Step5-Add a Splitter tile
- Select the plus symbol (“+”) and then add a Splitter tile.
- n the Splitter dialog box, do the following:
a.For Name, enter “Fulfillment split”.
b.For the two Splitter Settings fields, enter “Seattle” and “Chicago” respectively.
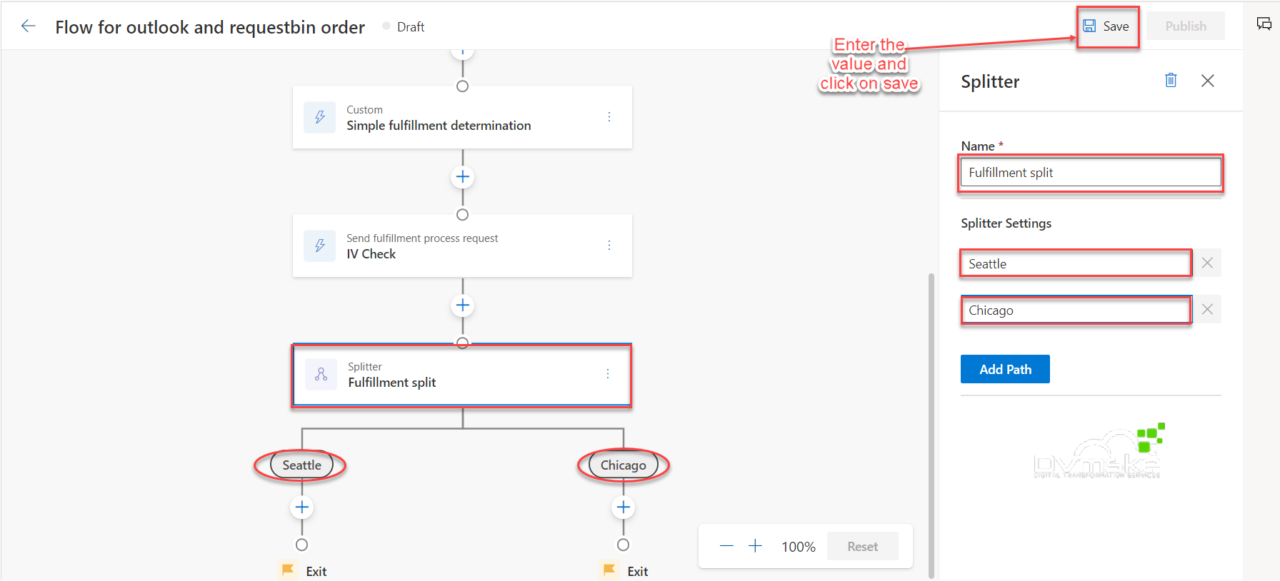
3.Click on save.
Step6-Add a Send to fulfillment tile under Seattle branch
- To add a Send to fulfillment tile under the Seattle branch, follow these steps.
- Go to Orchestration > Flows and select New.
- Under the Seattle branch, select the plus symbol (“+”) and then add a Send to fulfillment tile.
- In the Send to fulfillment dialog box, do the following:
a.For Name, enter “Send to Seattle”.
b.For Action Type, enter “Send to Fulfillment”.
c.For Input Events, enter “Creation of Fulfillment Order has Succeeded”.
d.For Provider Action, enter “IOM Lab Send to Fulfillment (Outlook)”.
e.For Filter Policy, enter “Fulfillment filter policy – Seattle”.
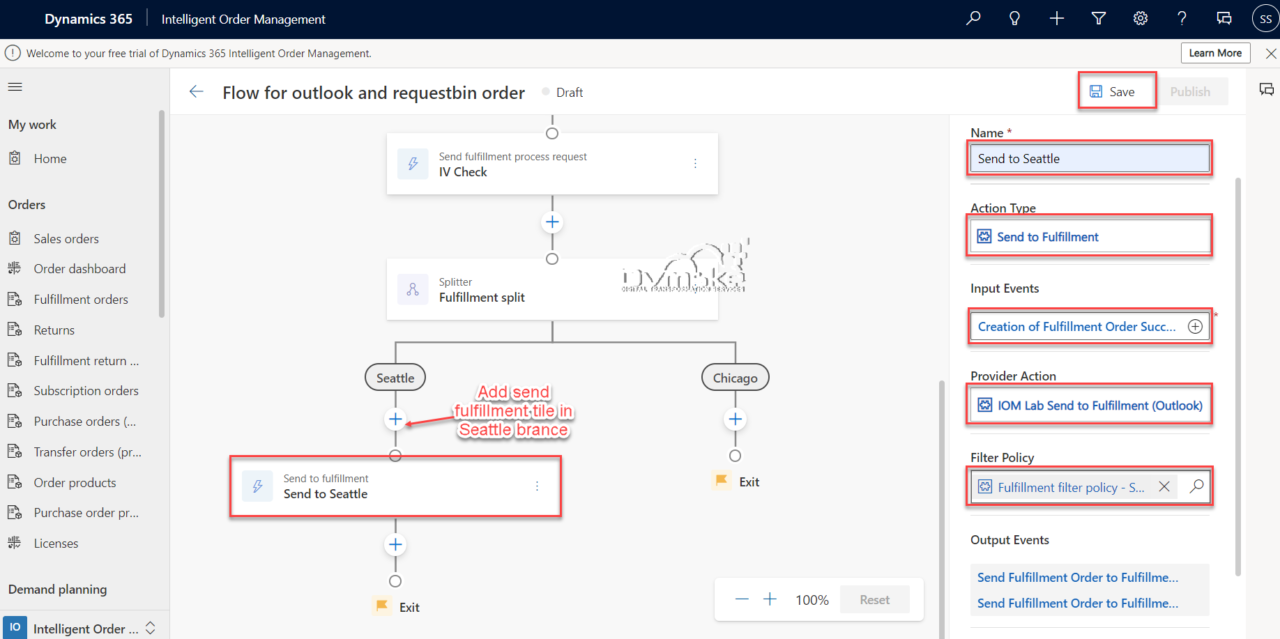
4.Click on Save.
Step7-Add a Send to fulfillment tile under Chicago branch
- To add a Send to fulfillment tile under the Chicago branch, follow these steps.
- Go to Orchestration > Flows and select New.
- Under the Chicago branch, select the plus symbol (“+”) and then add a Send to fulfillment tile.
- In the Send to fulfillment dialog box, do the following:
a.For Name, enter “Send to Chicago”.
b.For Action Type, enter “Send to Fulfillment”.
c.For Input Events, enter “Creation of Fulfillment Order has Succeeded”.
d.For Provider Action, enter “IOM Lab Send to Fulfillment (RequestBin)”.
e.For Filter Policy, enter “Fulfillment filter policy – Chicago”.
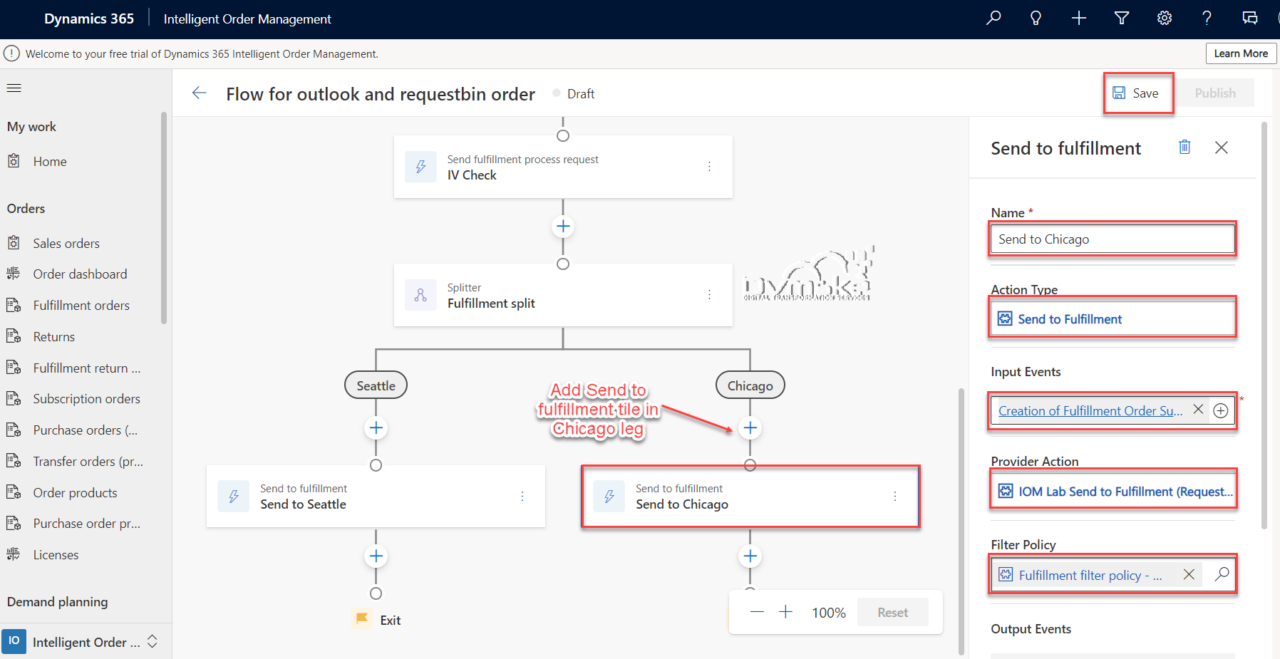
4.Click on Save.
Final step-After click on save publish the orchestration flow.