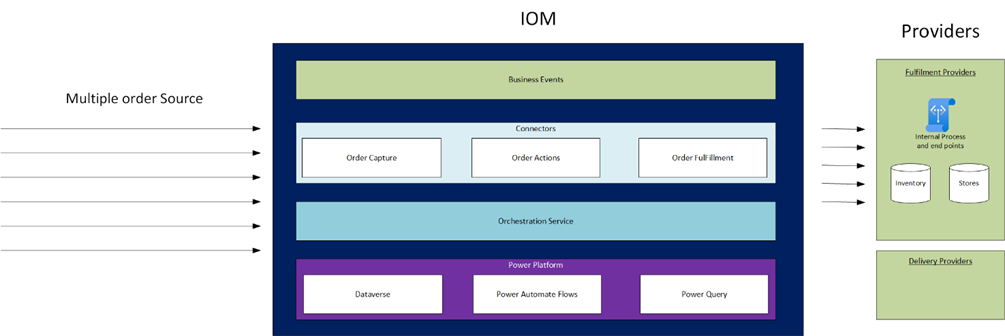
Microsoft Dynamics IOM makes it possible to manage the entire order lifecycle, from the moment a customer places an order to its final delivery — even returns management — all from a single, consolidated solution.
Intelligent Order Management gives users the flexibility to orchestrate their order journey and select their preferred fulfillment method. IOM also enables users to monitor the status of their order in real time, enhancing their experience from order generation to final delivery.
Intelligent Order Management is designed for customers who are implementing business to consumer, direct to consumer, and business to business order process flows.

In this Blog Series, We will provide Step by Step tutorial on Microsoft dynamics IOM i.e Creating orchestration flow, How to create a new provider in IOM and below are some important topic we will cover.
- Create 30 days free trial version for Microsoft IOM
- Create providers.
- Set up platform connection references.
- Set up Power Automate connections.
- Set up policies.
- Set up order orchestration flows.
- Set up internal and external ID mappings.
- Test the end-to-end order orchestration at runtime.
IOM Scenario - Step by Step Tutorial

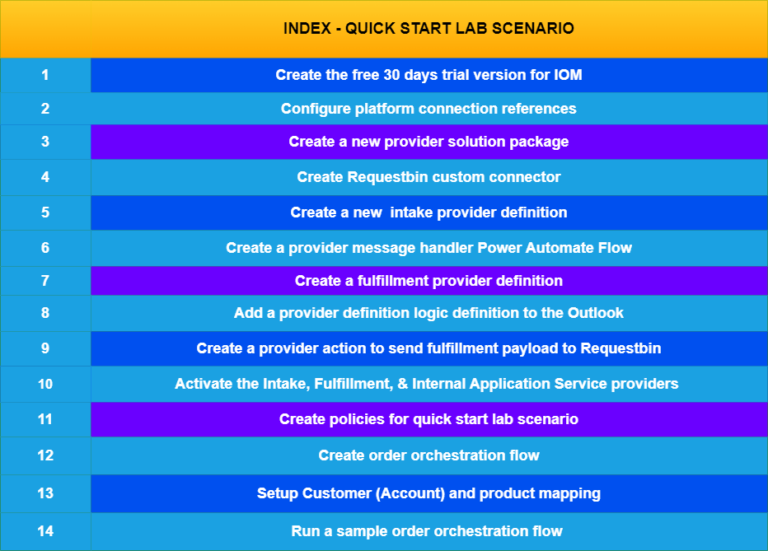
Step 1Create the free 30 Days Trial Version Environment for the Microsoft Dynamics 365 Intelligent Order Management
Step 2Configure platform connection references in Microsoft Dynamics 365 Intelligent order Management
Step 3Create a new provider solution package in Microsoft Dynamics 365 IOM
Step 4Create RequestBin custom connector for Quick Start Lab Scenario
Step 5Create new intake provider definition for Quick Start Lab Scenario in Microsoft Dynamics 365 Intelligent Order Management
Step 6Create a provider message handler for Quick Start Lab Scenario for Intelligent order Management
Step 7Create Fulfillment provider in Intelligent Order Management for Quick Start Lab Scenario in Microsoft Dynamics 365 Intelligent Order Management
Step 8Add a provider definition logic definition to the Outlook provider definition
Step 9Create a provider action to send a fulfillment payload to RequestBin
Step 10Activate the Intake , Fulfillment and Internal Application Service Provider
Step 11Create policies for Quick Start Lab Scenario in Microsoft Dynamics 365 Intelligent Order Management
Step 12Create order orchestration flow in Intelligent Order Management
Step 13Set up Customer(Account) and product mapping in Intelligent order Management
Step 14Run a sample order orchestration flow in Microsoft Dynamics 365 Intelligent Order Management
Below are high-level points involved in Scnerios for IOM Step by Step tutorial.
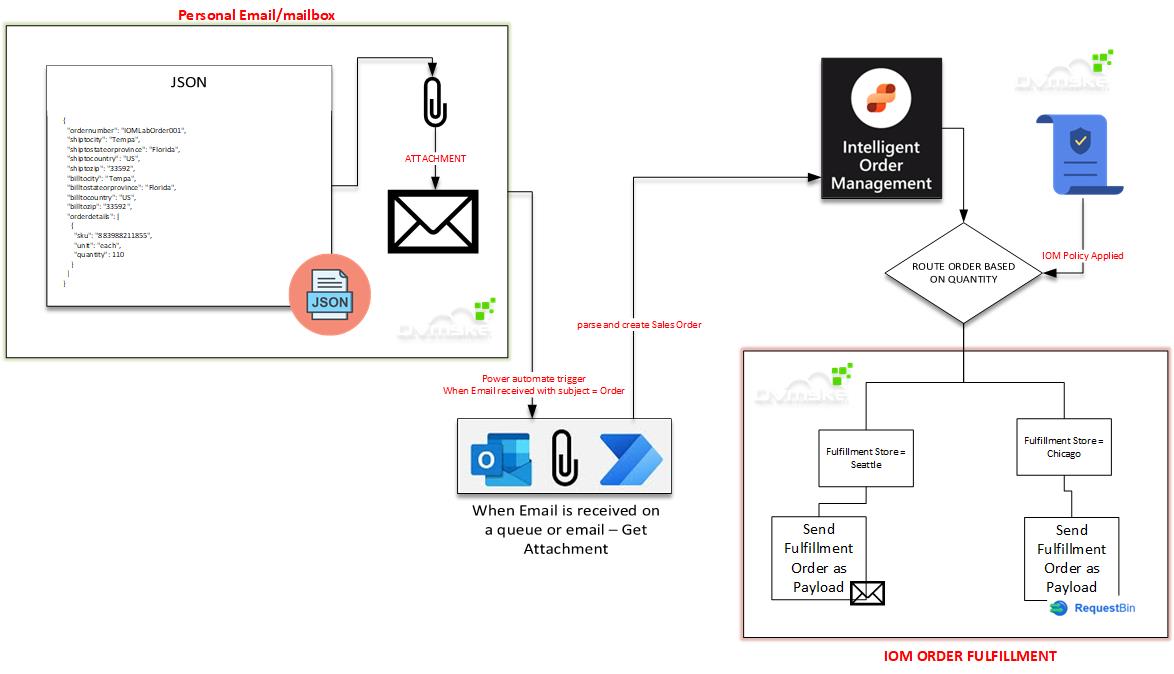
- The order comes into Customer Email or Sales Email with the Order JSON Payload file.
- Power Automate Flow, get the Email received where the Subject is Order and contain attachment as an email attachment.
- The sales order record is created with information from JSon File
- Orchestration Flow is executed automatically on creation
- Orchestration Steps i.e. Validate order header to ensure ship to the country is US.
- Orchestration Policy Executed i.e. Validate order line to make sure the quantity is more than 1 if the quantity is equal to 1 than our order is failed in order line validation.
- Orchestration condition i.e. Route order based on quantity.
- If quantity >= 100, send to Seattle store.
- If quantity < 100, send to Chicago store.
- If the order is routed to the Seattle store, emails with the fulfillment order payload as an attachment will be sent.
- If the order is routed to the Chicago store, requests with fulfillment orders as payload will be sent to RequestBin.
Steps to be followed to achieve the Goal


